Categories
Cloud Developer Tips

Alternatives to Elastic IPs for EC2 Name Resolution

How can you handle DNS lookups in EC2 without going crazy each time a resource’s IP address changes? One solution is to use an Elastic IP, a stable IP address that can be remapped to different instances, but Elastic IPs are not appropriate for all situations. This article explores the various methods of managing name resolution with EC2 instances.

Features of Different Name Resolution Methods

Before diving into the methods themselves let’s take a look at the factors to consider when evaluating methods of managing name resolution. Here are the factors:

  • Updatable in code. You will want to write code to make changes to the name resolution settings automatically, in response to infrastructure events (e.g. launching a new server).
  • Propagation delay. It can take some time for changes to name resolution settings to propagate (especially with DNS). A solution should offer some degree of assurance that changes will propagate within a known and reasonable period of time. [Note that some clients (e.g. the IE browser or the Java rutime) by default ignore the DNS TTL, artificially increasing the propagation delay for DNS-based methods.]
  • Compatible with DNS. If your service will be accessed by a web browser or other client that you do not control, your name resolution method will need to be compatible with DNS. Otherwise clients will not be able to resolve your hostnames properly.
  • Ease of implementation. Some solutions, while technically sufficient, are difficult to implement.
  • Public / Private IP addresses. Whether the solution can serve public and/or private IP addresses. If your clients are inside the same EC2 region then you want their lookups to resolve to the private IP address. Clients outside the same EC2 region should be served the public IP address.
  • Supply. Is there any practical limitation on the number of name resolution entries?
  • Cost. How much it costs to implement, including costs for idle resources and updating settings.

Methods of Name Resolution

As mentioned above, there are a number of different methods to manage name resolution. These are:

  • Traditional DNS.
  • Dynamically update the /etc/hosts file on the various application hosts. The /etc/hosts file on linux (like the C:\Windows\System32\Drivers\etc\hosts file on Windows) contains host-name-to-IP-address mappings that are checked before DNS is consulted, allowing it to override DNS. The file can be updated via pull (initiated by the host) or push (initiated by an external agent).
  • Store the mappings in S3 or SimpleDB. Clients must use the S3 or SimpleDB APIs for name resolution.
  • Use a dynamic DNS provider.
  • Run your own traditional DNS servers for your domain. Clients must be able to see these DNS servers.
  • Run your own dynamic DNS servers for your domain. Clients must be able to see these DNS servers.
  • Elastic IPs. The AWS pricing model discourages (though not strongly enough, I believe) Elastic IPs from being left unused, so you should use them for instances hosting services that are always on, such as your web server or your Facebook application. You should set up a DNS entry pointing the host names to the Elastic IPs, and then any remapping of the Elastic IP to a different instance happens via the EC2 API without requiring any change to DNS.

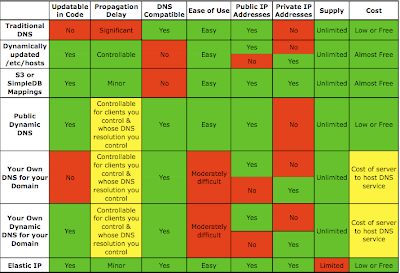
Here is a table (click on it to see it full size) showing how each of these name resolution methods stack up against each other:

Notes:

  • Dynamically updating /etc/hosts can be used to store either the public IP or the private IP but not both for the same client. You can use one /etc/hosts file for your clients inside the same EC2 region which contains the private IPs, and a different but corresponding /etc/hosts file for your clients outside the EC2 region (or outside EC2 completely) which contains the public IPs. The propagation delay is governed by the frequency with which you update the /etc/hosts file on each client. You can minimize this delay by increasing the frequency of updates. This technique is described in detail in an article by Tim Dysinger.
  • Similarly, the two “run your own DNS” methods (Your Own DNS for your Domain, Your Own Dynamic DNS for your Domain) can be used to resolve to either the public IP address or the private IP address, but not both for the same client. You should set up your clients inside EC2 to utilize the DNS service inside EC2, and the domain should be configured to point to the DNS service running outside EC2 so that clients outside EC2 will see the public IPs. Note that clients running inside EC2 whose DNS resolution you do not control (for example, another EC2 user’s client) will be referred to the public IPs. Jeff Roberts offers some great practical suggestions for running your own DNS inside EC2.

This table demonstrates the following:

  • Elastic IPs are the best choice when you need only a limited number of resolvable names and you will use them constantly. If you use their corresponding DNS name then they intelligently resolve to the public IP when looked up from the internet and to the private IP when looked up from within EC2.
  • If you need an unlimited number of resolvable names within EC2 then you should run your own dynamic DNS within EC2.
  • Methods that are incompatible with DNS should only be used with clients you control.

As we can see, Dynamic DNS (especially running your own) has one distinct advantage over using Elastic IPs: unlimited supply at no cost when unused.

When Running Your Own Dynamic DNS is Better than Elastic IPs

One application for running your own Dynamic DNS is a testing environment that includes large clusters of EC2 instances, for example database cluster or application nodes, connected to web layer instance(s). These cluster instances will only be visible to the front-end web tier, so they do not need a publicly resolvable IP address. And your testing environment is not likely to be running all the time. Elastic IPs would work here (presuming you needed only 5 or you could convince AWS to increase your Elastic IP limit to meet your needs), but would cost money when unused. A more economical solution might be to use your own Dynamic DNS within EC2 for these instances. If you have spare capacity on an existing instance then you can put the Dynamic DNS service there – otherwise you will need another instance, making the cost less attractive. In any case you’ll need the instance hosting the Dynamic DNS to have an Elastic IP to allow failover without affecting the clients. And you’ll need a script to dynamically configure the /etc/resolv.conf on your EC2 clients to point to the private IP address of the Dynamic DNS instance by looking up its Elastic IP’s DNS name.

Let’s compare the monthly costs of using Elastic IPs with the costs of running your own dynamic DNS for a testing environment such as the above. The cost reflects the following ingredients and assumptions:

  • The number of hours over the month that allocated addresses (DNS entries) are not associated with a live instance, in total for all allocated addresses. If you have DNS entries / addresses and leave them unmapped for 10 hours each then you have 100 unmapped hours.
  • The number of changes to the DNS mappings made that month.
  • The fractional cost of running an instance just to serve the dynamic DNS. If you have spare capacity on an existing instance then this is the instance cost multiplied by the fraction of the capacity that the dynamic DNS service uses. If you need to spin up a dedicated instance for the dynamic DNS service then this is the entire cost of that instance.
  • Pricing for Elastic IPs: free when in use. 1 cent per hour unused. First 100 remaps per month free, 10 cents per remap afterward.

It should be obvious that using dynamic DNS for this testing environment will be economical when

FractionalDNSInstanceCost < NumUnmappedHours * 0.01 + MAX(NumMappingChanges – 100, 0) * 0.1

For simplicity’s sake this can be rewritten in clearer terms:

FractionalDNSInstanceCost < NumInstances * ( NumHoursClusterUnused * 0.01 + MAX(NumTimesClusterIsLaunched – 100, 0) * 0.1)

Right about now I’m wishing Excel had better 3-D graphing capabilities. Here’s something helpful to visualize this:

The chart shows the monthly cost of running clusters of different sizes according to how many times the cluster is launched. The color “bands” show the areas in which the monthly cost lies, depending on how many hours the cluster remains unused. For a given number of times launched (i.e. for a given vertical line), the “bottom” point of each band is the cost when the cluster is unused zero hours (i.e. always on), and the “top” point is the cost when the cluster is unused for 500 hours (about 20 days).

The dominant factors are, first, the number of instances in the cluster and, second, the number of times the cluster will be launched. A cluster of 100 instances costs $10 each time it is launched beyond the first 100, (plus $1 for each hour unused). For large cluster sizes, the more times you launch, the higher the cost of using Elastic IPs will be and the more attractive the run-your-own dynamic DNS option becomes.

Categories
Cloud Developer Tips

Cool Things You Can Do with Shared EBS Snapshots

I’ve been awaiting this feature for a long time: Shared EBS Snapshots. Here’s a brief intro to using the feature, and some cool things you can do with shared snapshots. I also offer predictions about things that will appear as this feature gains adoption among developers.

How to Share an EBS Snapshot

Really, it’s easy. The first thing you’ll need to know is the Account Number of the user with whom you want to share the snapshot. If you want to make the snapshot public then you don’t need this. The account number can be found in the Your Account > Account Activity page. It’s in small numbers in the top-right of the page (so small you may need to click on the image below to see it in full size):


The person with whom you want to share the snapshot (you are the sharer, they are the “sharee”?) should tell you this 12-digit number. Don’t worry, sharee, it’s not a secret.

Once you have the sharee’s account number you, the sharer, go into the AWS Management Console and choose the Snapshots item. Find the snapshot you want to share and right-click on it, choosing “Snapshot Permissions”. You’ll get the following dialog:

Fill in the sharee’s account number, without the separating dashes, into the dialog, and hit “Save”. It should only take a few seconds and… presto! The snapshot should be visible in the sharee’s AWS Management Console Snapshots page.

Cool Things You Can Do with Shared Snapshots

Update 27 September 2009: Before you share snapshots publicly, read Eric Hammond’s warning about the dangers of doing so.

Easily move data between development, testing, and production

You’ve been keeping separate AWS accounts for your production environment, your testing environment, and your development environment, right? Right? Well, in case you haven’t, you no longer have any excuse not to do so. You can now share your database, your HDFS volumes (if you use Cloudera’s Hadoop distribution with EBS support), and anything else of significant size between these separate accounts. No more “tar, gzip, split into < 5GB chunks, upload to S3” and “download from S3, concatenate, untar-gzip”. Your data is ready to go with the newly-created volume.

Share entire setups for troubleshooting and support

If you support a product that is deployed in EC2 you no longer need to jump through hoops to get access to your customer’s files when there’s a problem. Simply have them put the relevant files into an EBS volume, snapshot it, and share the snapshot with you.

Deliver your application in a more granular manner

Until today you delivered your application as an AMI – perhaps even a DevPay AMI – and you may not have given your customers root access. But, if your application used less than 100% of an instance’s CPU, the customer was stuck paying for an entire CPU. Now, you can distribute your applications as a shared snapshot instead, and your customers will be free to use the rest of the instance’s CPU. You’ll just need to build a way to manage access, only allowing authorized customers to see the snapshot.

Deliver you customer’s results in a more usable format

If you run a service that provides large amounts of data, you no longer need to use S3 to share the results. Until today you had to store the results in S3, and your customer needed to retrieve the results from S3 in order to use them. No longer: now you can provide a shared snapshot of the results, and the customer can access them via their filesystem more simply. “The shared snapshot is the new bucket.”

Mount a volume created from a shared snapshot at startup

In a previous article I explained how to automatically mount an EBS volume created from a snapshot during the instance’s startup sequence. I provided a script that gets the snapshot ID via the user-data and does all the rest automatically. Now you can also use snapshots that have been shared.

Update 25 September 2009: Share entire machines

Reader Robert Staveley (Tom) comments below about his use for shared snapshots: Sharing entire machines – boot code and everything – between development, testing, and production accounts. Using the technique to boot an instance from an EBS volume he points out that the entire bootable hard drive and all applications (even beyond 10GB) can be shared between these accounts.

Things to Expect in the Future

Shared snapshots are still a very new feature, but here are some things I expect to happen now that this is possible.

  • The AWS Management Console is the only UI that allows you to share a snapshot. ElasticFox will be adding this capability Real Soon Now, and I am sure others will as well.
  • Alternatives to AMIs. AMIs have many limitations, such as the 10GB maximum size, that can be circumvented using a technique I described to boot from an EBS volume. I expect to see OS distributions packaged as a shared EBS snapshot. These distributions could all share a common AMI containing just enough code to create a volume from the shared distribution snapshot, mount it, and boot from it. No more headaches bundling an AMI – just share a new bootable EBS snapshot.
    Update 3 December 2009: This prediction has come true, with AWS’s release of EBS-backed AMIs.
  • Payment gateway services for managing access to shared snapshots. Now that you’re distributing software as a shared snapshot you’ll need to manage access to the snapshot, limiting it to authorized customers. You might build that system yourself today, but soon we’ll see third-party services that do this for you.
    Update 19 April 2012: This prediction has come true, with AWS’s release of the AWS Marketplace.

Do you have other cool uses or predictions for shared snapshots? Please comment!

Categories
Cloud Developer Tips

Solving Common ELB Problems with a Sanity Test

Help! My ELB isn’t serving files!
Whoa! My back-end instances work but not the ELB!
Hey! I can’t get the ELB to work!

These are among the most common Elastic Load Balancer problems raised on the Amazon EC2 Discussion Forums. Inspired by Eric Hammond’s indispensible article Solving “I can’t connect to my server on Amazon EC2”, here is a helpful guide to debugging these common ELB issues, as well as a utility to perform sanity tests on your own ELBs.

Questions to Answer

You’re trying to figure out what’s wrong and you need to know where to start looking. Or, you’re posting your problem on the AWS forums and you want help as quickly as possible. The best way to help yourself or to get help quickly is to examine the basic facts of your situation. Here are some questions to answer for yourself and in your forum post:

  1. What is the output of elb-describe-lbs elbName --show-xml ? This gives the basic details of the ELB, which are critical to diagnosing any problem. If you are posting to the forums and want to keep the DNS name of the ELB private then obscure it in the output. One reason to obscure the DNS name is to prevent readers from accessing your ELB-based service. However, this precaution does not add any security because the DNS information is public, and – presumably – you are using a DNS CNAME entry to integrate the ELB into your domain’s DNS.
  2. What is the output of elb-describe-instance-health elbName ? This provides crucial information about the health of the instances.
  3. What resource are you trying to access via the ELB and what tool are you using to access it and from what location? The resource will likely be a URL of the form http://ELB-DNS-Name/index.html or maybe https://ELB-DNS-Name/index.html, or it might be “I’m running a POP server on port 1234”. The tool you’re using to access it is most likely a browser or HTTP client (Firefox, or wget), or possibly “Microsoft Outlook version 5.4”. The location is either “my local machine” or “an EC2 instance”. Also, can you access the same resource when you connect directly to a back-end instance via its public IP address or host name from a client outside EC2? A public-facing URL pointing directly to a back-end instance looks like this: http://ec2-123-213-123-31.compute-1.amazonaws.com/index.html . And, can you access the same resource when you connect directly to a back-end instance via its private IP address or host name from another instance within EC2? Such a URL looks like this: http://domU-12-31-34-00-69-B9.compute-1.internal/index.html .
  4. Can you access the health check resource directly via the ELB DNS name, and via the back-end instance’s public IP address, and via the back-end instance’s private IP address? If your health check is configured with target=HTTP:8080/check.html then try to access http://ELB-DNS-Name:8080/check.html (which is via the ELB) and http://ec2-123-213-123-31.compute-1.amazonaws.com:8080/check.html (which is via the instance’s public IP address) and http://domU-12-31-34-00-69-B9.compute-1.internal:8080/check.html (which is via the instance’s private IP address, and only accessible from within EC2).
  5. What are the security groups and availability zones for each instance in the ELB? This is visible in the output of ec2-describe-instances i-11111111 i-22222222 ... As above, you might want to obscure the public and private DNS names of these instances in the output.
  6. Can all the back-end instances receive traffic on the instance ports of the ELB listeners and the health check? This can be checked from the output of ec2-describe-group groupName1 groupName2 ... for all the groups shown in question 5’s ec2-describe-instances command.
  7. Do logs on your back-end instances show any connections from ELB?
Common ELB Problems

Okay, now that you know what information is important to diagnosing the problem, here is a look at some of the common gotchas, how to detect them, and how to fix them. These descriptions refer to the above questions by number.Common problems and solutions include:

  • Security groups on back-end instances don’t allow access to the instance ports and health check port. Back-end instances must have all ports on which they receive traffic from the ELB (#1) open to CIDR 0.0.0.0/0 in one of their associated security groups (#6). Fix this by changing the permissions on the security groups associated with the instances. Note: this fix takes effect within a few seconds and does not require launching new instance or rebooting existing instances.
  • Back-end instances are not healthy (InService). When an instance fails the health check (#1) it is marked as OutOfService (#2) and the ELB does not route traffic to it anymore. To fix this you need to determine why the ELB cannot access the health check resource. Note: there is currently a bug in ELB where instances initially are marked as InService when added to the ELB, until they fail the health check. So you’ll want to make sure you’ve given ELB enough time to detect a failed health check. Update August 2010: AWS folks say that bug has been fixed.
  • An availability zone is enabled on the ELB but has no healthy back-end instances. If you have an availability zone enabled for your ELB (#1) but no healthy instances in that availability zone (#5 and #2), you’ll get 503 Gateway Timeout or other errors. Fix this by adding an instance in that availability zone to the ELB or disabling that availability zone for the ELB.
  • You cannot see a requested resource (#3) or the health check URL (#4) using the ELB DNS name. In this case, check that the URL exists on the back-end instances and look at the back-end instance’s logs (#7) to see if the ELB forwarded your connection or not. If you can see the requested resource using the public address of a back-end instance then check the instance’s security groups (#6) to see that they grant access to the instance’s port.
  • The health check port is not the same as listener target port (#1). While this does not necessarily indicate a problem, for most ELBs the health check should use the same port as one of the listeners. Setting up your ELB to have a health check performed on a different port than the load-balanced traffic is perfectly valid, but you likely want the health check to use the same path that the load-balanced traffic takes to reach your app (and also to exercise a representative set of features used by your app).

I will update this article with new common issues as they appear.

An ELB Sanity Test Utility

If you have your thinking cap on you’ll notice that detecting the first three of the common ELB problems can be automated. Here is an ELB sanity test utility for linux which automates these tests. Save it or download it as follows:

curl -o elb-sanity-test.tar.gz -L https://github.com/shlomoswidler/elb-sanity-test/releases/download/v0.1/elb-sanity-test.tar.gz

Next, unpack it:

tar xzf elb-sanity-test.tar.gz
cd elb-sanity-test

Next, set up the utility with your credentials. Edit the elb-sanity-test script file, setting AWS_CREDENTIAL_FILE to point to a file containing your AWS credentials in the following format:

AWSAccessKeyId=your-Access-Key-Id
AWSSecretKey=your-Secret-Key

The above is the same format that can be used to specify your AWS credentials for the ELB API Tools (see the README.TXT and credential-file-path.template file in the ELB API Tools bundle).

To run the ELB sanity test:

cd elb-sanity-test
./elb-sanity-test

Here is sample output showing an ELB that passes the sanity test:

$ ./elb-sanity-test
JUnit version 4.5
Test: all instances have their Security Groups defined to allow access to the ELB listener port
Load Balancer: someLB
ELB someLB has a listener that uses instance-port 8080 and instance i-360ef05e has that TCP port open to the world.
ELB someLB has a listener that uses instance-port 8081 and instance i-360ef05e has that TCP port open to the world.
Test: all ELBs have a HealthCheck on a port that the listener directs traffic to
Load Balancer: someLB
ELB someLB has a configured HealthCheck on listener port 8080
Test: all ELBs have InService instances in each configured availability zone
Load Balancer: somLB
ELB someLB has InService instances in each configured availability zone
Time: 5.22
Tests run: 3,  Failures: 0

The elb-sanity-test utility performs the following sanity tests on every ELB defined in your account:

  • All instances have their security groups defined to allow access to the ELB listener port.
  • All ELBs have a health check on a port that the listener directs traffic to.
  • All ELBs have healthy instances in each configured availability zone.

If a sanity test fails the utility shows a very verbose error message explaining what is wrong.

Some notes about the elb-sanity-test bundle:

  • The utility is written in Java, which is also required for the ELB tools. If you can run the ELB API Tools, you already have all the prerequisites to run this sanity test.
  • The bundle includes source code and is licensed under the Apache License, Version 2.0.
  • The bundle includes all dependency jars necessary to run the script. It uses the JUnit framework and the Typica library.

I would be happy to re-bundle the utility to include a .bat or .cmd file to make it easy to run the script on Windows. If you write one, please add it it in the comments and I’ll include it.

Getting Further Help

If you still have an ELB issue after trying the above advice and the elb-sanity-test utility, please post in the AWS EC2 forum. Questions about the elb-sanity-test utility specifically or about this article are welcome in the comments below.

Update 15 September 2009: Ylastic integrated my elb-sanity-test script into their EC2 management dashboard.

Update 11 October 2009: elb-sanity-test has been released as part of the open-source ec2-elb-tests project hosted on Google Code. And, if you use this utility, please subscribe to the ec2-elb-tests Google Group.

Update 21 July 2014: The project has moved to be hosted on GitHub.


Categories
Cloud Developer Tips

How to Keep Your AWS Credentials on an EC2 Instance Securely

If you’ve been using EC2 for anything serious then you have some code on your instances that requires your AWS credentials. I’m talking about code that does things like this:

  • Attach an EBS volume
  • Download your application from a non-public location in S3
  • Send and receive SQS messages
  • Query or update SimpleDB

All these actions require your credentials. How do you get the credentials onto the instance in the first place? How can you store them securely once they’re there? First let’s examine the issues involved in securing your keys, and then we’ll explore the available options for doing so.

Note:  With the release of IAM Roles, you can now pass access credentials to an EC2 instance via the metadata automatically. I wrote a chef recipe to help you set up the new AWS Command Line tools, which used IAM Role credentials automatically.

Potential Vulnerabilities in Transferring and Storing Your Credentials

There are a number of vulnerabilities that should be considered when trying to protect a secret. I’m going to ignore the ones that result from obviously foolish practice, such as transferring secrets unencrypted.

  1. Root: root can get at any file on an instance and can see into any process’s memory. If an attacker gains root access to your instance, and your instance can somehow know the secret, your secret is as good as compromised.
  2. Privilege escalation: User accounts can exploit vulnerabilities in installed applications or in the kernel (whose latest privilege escalation vulnerability was patched in new Amazon Kernel Images on 28 August 2009) to gain root access.
  3. User-data: Any user account able to open a socket on an EC2 instance can see the user-data by getting the URL http://169.254.169.254/latest/user-data . This is exploitable if a web application running in EC2 does not validate input before visiting a user-supplied URL. Accessing the user-data URL is particularly problematic if you use the user-data to pass in the secret unencrypted into the instance – one quick wget (or curl) command by any user and your secret is compromised. And, there is no way to clear the user-data – once it is set at launch time, it is visible for the entire life of the instance.
  4. Repeatability: HTTPS URLs transport their content securely, but anyone who has the URL can get the content. In other words, there is no authentication on HTTPS URLs. If you specify an HTTPS URL pointing to your secret it is safe in transit but not safe from anyone who discovers the URL.

Benefits Offered by Transfer and Storage Methods

Each transfer and storage method offers a different set of benefits. Here are the benefits against which I evaluate the various methods presented below:

  1. Easy to do. It’s easy to create a file in an AMI, or in S3. It’s slightly more complicated to encrypt it. But, you should have a script to automate the provision of new credentials, so all of the methods are graded as “easy to do”.
  2. Possible to change (now). Once an instance has launched, can the credentials it uses be changed?
  3. Possible to change (future). Is it possible to change the credentials that will be used by instances launched in the future? All methods provide this benefit but some make it more difficult to achieve than others, for example instances launched via Auto Scaling may require the Launch Configuration to be updated.


How to Put AWS Credentials on an EC2 Instance

With the above vulnerabilities and benefits in mind let’s look at different ways of getting your credentials onto the instance and the consequences of each approach.

Mitch Garnaat has a great set of articles about the AWS credentials. Part 1 explores what each credential is used for, and part 2 presents some methods of getting them onto an instance, the risks involved in leaving them there, and a strategy to mitigate the risk of them being compromised. A summary of part 1: keep all your credentials secret, like you keep your bank account info secret, because they are – literally – the keys to your AWS kingdom.

As discussed in part 2 of Mitch’s article, there are a number of methods to get the credentials (or indeed, any secret) onto an instance. Here are two, evaluated in light of the benefits presented above:

1. Burn the secret into the AMI

Pros:

  • Easy to do.

Cons:

  • Not possible to change (now) easily. Requires SSHing into the instance, updating the secret, and forcing all applications to re-read it.
  • Not possible to change (future) easily. Requires bundling a new AMI.
  • The secret can be mistakenly bundled into the image when making derived AMIs.

Vulnerabilities:

  • root, privilege escalation.

2. Pass the secret in the user-data

Pros:

  • Easy to do. Putting the secret into the user-data must be integrated into the launch procedure.
  • Possible to change (future). Simply launch new instances with updated user-data. With Auto Scaling, create a new Launch Configuration with the updated user-data.

Cons:

  • Not possible to change (now). User-data cannot be changed once an instance is launched.

Vulnerabilities:

  • user-data, root, privilege escalation.

Here are some additional methods to transfer a secret to an instance, not mentioned in the article:

3. Put the secret in a public URL
The URL can be on a website you control or in S3. It’s insecure and foolish to keep secrets in a publicly accessible URL. Please don’t do this, I had to mention it just to be comprehensive.

Pros:

  • Easy to do.
  • Possible to change (now). Simply update the content at that URL. Any processes on the instance that read the secret each time will see the new value once it is updated.
  • Possible to change (future).

Cons:

  • Completely insecure. Any attacker between the endpoint and the EC2 boundary can see the packets and discover the URL, revealing the secret.

Vulnerabilities:

  • repeatability, root, privilege escalation.

4. Put the secret in a private S3 object and provide the object’s path
To get content from a private S3 object you need the secret access key in order to authenticate with S3. The question then becomes “how to put the secret access key on the instance”, which you need to do via one of the other methods.

Pros:

  • Easy to do.
  • Possible to change (now). Simply update the content at that URL. Any processes on the instance that read the secret each time will see the new value once it is updated.
  • Possible to change (future).

Cons:

  • Inherits the cons of the method used to transfer the secret access key.

Vulnerabilities:

  • root, privilege escalation.

5. Put the secret in a private S3 object and provide a signed HTTPS S3 URL
The signed URL must be created before launching the instance and specified somewhere that the instance can access – typically in the user-data. The signed URL expires after some time, limiting the window of opportunity for an attacker to access the URL. The URL should be HTTPS so that the secret cannot be sniffed in transit.

Pros:

  • Easy to do. The S3 URL signing must be integrated into the launch procedure.
  • Possible to change (now). Simply update the content at that URL. Any processes on the instance that read the secret each time will see the new value once it is updated.
  • Possible to change (future). In order to integrate with Auto Scaling you would need to (automatically) update the Auto Scaling Group’s Launch Configuration to provide an updated signed URL for the user-data before the previously specified signed URL expires.

Cons:

  • The secret must be cached on the instance. Once the signed URL expires the secret cannot be fetched from S3 anymore, so it must be stored on the instance somewhere. This may make the secret liable to be burned into derived AMIs.

Vulnerabilities:

  • repeatability (until the signed URL expires), root, privilege escalation.

6. Put the secret on the instance from an outside source, via SCP or SSH
This method involves an outside client – perhaps your local computer, or a management node – whose job it is to put the secret onto the newly-launched instance. The management node must have the private key with which the instance was launched, and must know the secret in order to transfer it. This approach can also be automated, by having a process on the management node poll every minute or so for newly-launched instances.

Pros:

  • Easy to do. OK, not “easy” because it requires an outside management node, but it’s doable.
  • Possible to change (now). Have the management node put the updated secret onto the instance.
  • Possible to change (future). Simply put a new secret onto the management node.

Cons:

  • The secret must be cached somewhere on the instance because it cannot be “pulled” from the management node when needed. This may make the secret liable to be burned into derived AMIs.

Vulnerabilities:

  • root, privilege escalation.

The above methods can be used to transfer the credentials – or any secret – to an EC2 instance.

Instead of transferring the secret directly, you can transfer an encrypted secret. In that case, you’d need to provide a decryption key also – and you’d use one of the above methods to do that. The overall security of the secret would be influenced by the combination of methods used to transfer the encrypted secret and the decryption key. For example, if you encrypt the secret and pass it in the user-data, providing the decryption key in a file burned into the AMI, the secret is vulnerable to anyone with access to both user-data and the file containing the decryption key. Also, if you encrypt your credentials then changing the encryption key requires changing two items: the encryption key and the encrypted credentials. Therefore, changing the encryption key can only be as easy as changing the credentials themselves.

How to Keep AWS Credentials on an EC2 Instance

Once your credentials are on the instance, how do you keep them there securely?

First off, let’s remember that in an environment out of your control, such as EC2, you have no guarantees of security. Anything processed by the CPU or put into memory is vulnerable to bugs in the hypervisor (the virtualization provider) or to malicious AWS personnel (though the AWS Security White Paper goes to great lengths to explain the internal procedures and controls they have implemented to mitigate that possibility) or to legal search and seizure. What this means is that you should only run applications in EC2 for which the risk of secrets being exposed via these vulnerabilities is acceptable. This is true of all applications and data that you allow to leave your premises. But this article is about the security of the AWS credentials, which control the access to your AWS resources. It is perfectly acceptable to ignore the risk of abuse by AWS personnel exposing your credentials because AWS folks can manipulate your account resources without needing your credentials! In short, if you are willing to use AWS then you trust Amazon with your credentials.

There are three ways to store information on a running machine: on disk, in memory, and not at all.

1. Keeping a secret on disk
The secret is stored in a file on disk, with the appropriate permissions set on the file. The secret survives a reboot intact, which can be a pro or a con: it’s a good thing if you want the instance to be able to remain in service through a reboot; it’s a bad thing if you’re trying to hide the location of the secret from an attacker, because the reboot process contains the script to retrieve and cache the secret, revealing its cached location. You can work around this by altering the script that retrieves the secret, after it does its work, to remove traces of the secret’s location. But applications will still need to access the secret somehow, so it remains vulnerable.

Pros:

  • Easily accessible by applications on the instance.

Cons:

  • Visible to any process with the proper permissions.
  • Easy to forget when bundling an AMI of the instance.

Vulnerabilities:

  • root, privilege escalation.

2. Keeping the secret in memory
The secret is stored as a file on a ramdisk. (There are other memory-based methods, too.) The main difference between storing the secret in memory and on the filesystem is that memory does not survive a reboot. If you remove the traces of retrieving the secret and storing it from the startup scripts after they run during the first boot, the secret will only exist in memory. This can make it more difficult for an attacker to discover the secret, but it does not add any additional security.

Pros:

  • Easily accessible by applications on the instance.

Cons:

  • Visible to any process with the proper permissions.

Vulnerabilities:

  • root, privilege escalation.

3. Do not store the secret; retrieve it each time it is needed
This method requires your applications to support the chosen transfer method.

Pros:

  • Secret is never stored on the instance.

Cons:

  • Requires more time because the secret must be fetched each time it is needed.
  • Cannot be used with signed S3 URLs. These URLs expire after some time and the secret will no longer be accessible. If the URL does not expire in a reasonable amount of time then it is as insecure as a public URL.
  • Cannot be used with externally-transferred (via SSH or SCP) secrets because the secret cannot be pulled from the management node. Any protocol that tries to pull the secret from the management node can be also be used by an attacker to request the secret.

Vulnerabilities:

  • root, privilege escalation.

Choosing a Method to Transfer and Store Your Credentials

The above two sections explore some options for transferring and storing a secret on an EC2 instance. If the secret is guarded by another key – such as an encryption key or an S3 secret access key – then this key must also be kept secret and transferred and stored using one of those same methods. Let’s put all this together into some tables presenting the viable options.

Unencrypted Credentials

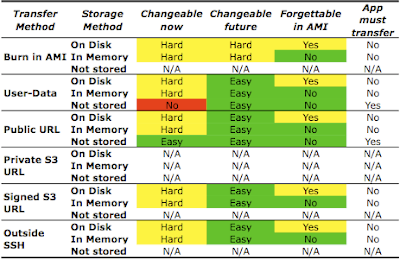
Here is a summary table evaluating the transfer and storage of unencrypted credentials using different combinations of methods:

Transferring and Keeping Unencrypted Credentials

Some notes on the above table:

  • Methods making it “hard” to change credentials are highlighted in yellow because, through scripting, the difficulty can be minimized. Similarly, the risk of forgetting credentials in an AMI can be minimized by scripting the AMI creation process and choosing a location for the credential file that is excluded from the AMI by the script.
  • While you can transfer credentials using a private S3 URL, you still need to provide the secret access key in order to access that private S3 URL. This secret access key must also be transferred and stored on the instance, so the private S3 URL is not by itself usable. See below for an analysis of using a private S3 URL to transfer credentials. Therefore the Private S3 URL entries are marked as N/A.
  • You can burn credentials into an AMI and store them in memory. The startup process can remove them from the filesystem and place them in memory. The startup process should then remove all traces from the startup scripts mentioning the key’s location in memory, in order to make discovery more difficult for an attacker with access to the startup scripts.
  • Credentials burned into the AMI cannot be “not stored”. They can be erased from the filesystem, but must be stored somewhere in order to be usable by applications. Therefore these entries are marked as N/A.
  • Credentials transferred via a signed S3 URL cannot be “not stored” because the URL expires and, once that happens, is no longer able to provide the credentials. Thus, these entries are marked N/A.
  • Credentials “pushed” onto the instance from an outside source, such as SSH, cannot be “not stored” because they must be accessible to applications on the instance. These entries are marked N/A.

A glance at the above table shows that it is, overall, not difficult to manage unencrypted credentials via any of the methods. Remember: don’t use the Public URL method, it’s completely unsecure.

Bottom line: If you don’t care about keeping your credentials encrypted then pass a signed S3 HTTPS URL in the user-data. The startup scripts of the instance should retrieve the credentials from this URL and store them in a file with appropriate permissions (or in a ramdisk if you don’t want them to remain through a reboot), then the startup scripts should remove their own commands for getting and storing the credentials. Applications should read the credentials from the file (or directly from the signed URL if you don’t care that it will stop working after it expires).

Encrypted Credentials

We discussed 6 different ways of transferring credentials and 3 different ways of storing them. A transfer method and a storage method must be used for the encrypted credentials and for the decryption key. That gives us 36 combinations of transfer methods, and 9 combinations of storage methods, for a grand total of 324 choices.

Here are the first 54, summarizing the options when you choose to burn the encrypted credentials into the AMI:

As (I hope!) you can see, all combinations that involve burning encrypted credentials into the AMI make it hard (or impossible) to change the credentials or the encryption key, both on running instances and for future ones.

Here are the next set, summarizing the options when you choose to pass encrypted credentials via the user-data:

Passing encrypted credentials in the user-data requires the decryption key to be transferred also. It’s pointless from a security perspective to pass the decryption key together with the encrypted credentials in the user-data. The most flexible option in the above table is to pass the decryption key via a signed S3 HTTPS URL (specified in the user-data, or specified at a public URL burned into the AMI) with a relatively short expiry time (say, 4 minutes) allowing enough time for the instance to boot and retrieve it.

Here is a summary of the combinations when the encrypted credentials are passed via a public URL:

It might be surprising, but passing encrypted credentials via a public URL is actually a viable option. You just need to make sure you send and store the decryption key securely, so send that key via a signed S3 HTTPS URL (specified in the user-data on specified at a public URL burned into the AMI) for maximum flexibility.

The combinations with passing the encrypted credentials via a private S3 URL are summarized in this table:

As explained earlier, the private S3 URL is not usable by itself because it requires the AWS secret access key. (The access key id is not a secret). The secret access key can be transferred and stored using the combinations of methods shown in the above table.

The most flexible of the options shown in the above table is to pass in the secret access key inside a signed S3 HTTPS URL (which is itself provided in the user-data or at a public URL burned into the AMI).

Almost there…. This next table summarizes the combinations with encrypted credentials passed via a signed S3 HTTPS URL:

The signed S3 HTTPS URL containing the encrypted credentials can be specified in the user-data or specified behind a public URL which is burned into the AMI. The best options for providing the decryption key are via another signed URL or from an external management node via SSH or SCP.

And, the final section of the table summarizing the combinations of using encrypted credentials passed in via SSH or SCP from an outside management node:

The above table summarizing the use of an external management node to place encrypted credentials on the instance shows the same exact results as the previous table (for a signed S3 HTTPS URL). The same flexibility is achieved using either method.

The Bottom Line

Here’s a practical recommendation: if you have code that generates signed S3 HTTPS URLs then pass in two signed URLs into the user-data, one containing the encrypted credentials and the other containing the decryption key. The startup sequence of the AMI should read these two items from their URLs, decrypt the credentials, and store the credentials in a ramdisk file with the minimum permissions necessary to run the applications. The start scripts should then remove all traces of the procedure (beginning with “read the user-data URL” and ending with “remove all traces of the procedure”) from themselves.

If you don’t have code to generate signed S3 URLs then burn the encrypted credentials into the AMI and pass the decryption key via the user-data. As above, the startup sequence should decrypt the credentials, store them in a ramdisk, and destroy all traces of the raw ingredients and the process itself.

This article is an informal review of the benefits and vulnerabilities offered by different methods of transferring credentials to and storing credentials on an EC2 instance. In a future article I will present scripts to automate the procedures described. In the meantime, please leave your feedback in the comments.

Categories
Cloud Developer Tips

Amazon S3 Gotcha: Using Virtual Host URLs with HTTPS

Amazon S3 is a great place to store static content for your web site. If the content is sensitive you’ll want to prevent the content from being visible while in transit from the S3 servers to the client. The standard way to secure the content during transfer is by https – simply request the content via an https URL. However, this approach has a problem: it does not work for content in S3 buckets that are accessed via a virtual host URL. Here is an examination of the problem and a workaround.

Accessing S3 Buckets via Virtual Host URLs

S3 provides two ways to access your content. One way uses s3.amazonaws.com host name URLs, such as this:

http://s3.amazonaws.com/mybucket.mydomain.com/myObjectKey

The other way to access your S3 content uses a virtual host name in the URL:

http://mybucket.mydomain.com.s3.amazonaws.com/myObjectKey

Both of these URLs map to the same object in S3.

You can make the virtual host name URL shorter by setting up a DNS CNAME that maps mybucket.mydomain.com to mybucket.mydomain.com.s3.amazonaws.com. With this DNS CNAME alias in place, the above URL can also be written as follows:

http://mybucket.mydomain.com/myObjectKey

This shorter virtual host name URL works only if you setup the DNS CNAME alias for the bucket.

Virtual host names in S3 is a convenient feature because it allows you to hide the actual location of the content from the end-user: you can provide the URL http://mybucket.mydomain.com/myObjectKey and then freely change the DNS entry for mybucket.mydomain.com (to point to an actual server, perhaps) without changing the application. With the CNAME alias pointing to mybucket.mydomain.com.s3.amazonaws.com, end-users do not know that the content is actually being served from S3. Without the DNS CNAME alias you’ll need to explicitly use one of the URLs that contain s3.amazonaws.com in the host name.

The Problem with Accessing S3 via https URLs

https encrypts the transferred data and prevents it from being recovered by anyone other than the client and the server. Thus, it is the natural choice for applications where protecting the content in transit is important. However, https relies on internet host names for verifying the identity certificate of the server, and so it is very sensitive to the host name specified in the URL.

To illustrate this more clearly, consider the servers at s3.amazonaws.com. They all have a certificate issued to *.s3.amazonaws.com. [“Huh?” you say. Yes, the SSL certificate for a site specifies the host name that the certificate represents. Part of the handshaking that sets up the secure connection ensures that the host name of the certificate matches the host name in the request. The * indicates a wildcard certificate, and means that the certificate is valid for any subdomain also.] If you request the https URL https://s3.amazonaws.com/mybucket.mydomain.com/myObjectKey, then the certificate’s host name matches the requested URL’s host name component, and the secure connection can be established.

If you request an object in a bucket without any periods in its name via a virtual host https URL, things also work fine. The requested URL can be https://aSimpleBucketName.s3.amazonaws.com/myObjectKey. This request will arrive at an S3 server (whose certificate was issued to *.s3.amazonaws.com), which will notice that the URL’s host name is indeed a subdomain of s3.amazonaws.com, and the secure connection will succeed.

However, if you request the virtual host URL https://mybucket.mydomain.com.s3.amazonaws.com/myObjectKey, what happens? The host name component of the URL is mybucket.mydomain.com.s3.amazonaws.com, but the actual server that gets the request is an S3 server whose certificate was issued to *.s3.amazonaws.com. Is mybucket.mydomain.com.s3.amazonaws.com a subdomain of s3.amazonaws.com? It depends who you ask, but most up-to-date browsers and SSL implementations will say “no.” A multi-level subdomain – that is, a subdomain that has more than one period in it – is not considered to be a proper subdomain by recent Firefox, Internet Explorer, Java, and wget clients. So the client will report that the server’s SSL certificate, issued to *.s3.amazonaws.com, does not match the host name of the request, mybucket.mydomain.com.s3.amazonaws.com, and refuse to establish a secure connection.

The same problem occurs when you request the virtual host https URL https://mybucket.mydomain.com/myObjectKey. The request arrives – after the client discovers that mybucket.mydomain.com is a DNS CNAME alias for mybucket.mydomain.com.s3.amazonaws.com – at an S3 server with an SSL certificate issued to *.s3.amazonaws.com. In this case the host name mybucket.mydomain.com clearly does not match the host name on the certificate, so the secure connection again fails.

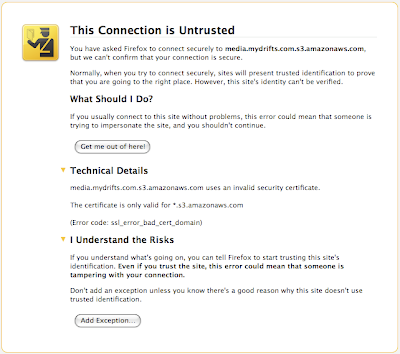
Here is what a failed certificate check looks like in Firefox 3.5, when requesting https://images.mydrifts.com.s3.amazonaws.com/someContent.txt:

Here is what happens in Java:

javax.net.ssl.SSLHandshakeException: java.security.cert.CertificateException: No subject alternative DNS name matching media.mydrifts.com.s3.amazonaws.com found.
at com.sun.net.ssl.internal.ssl.Alerts.getSSLException(Alerts.java:174)
at com.sun.net.ssl.internal.ssl.SSLSocketImpl.fatal(SSLSocketImpl.java:1591)
at com.sun.net.ssl.internal.ssl.Handshaker.fatalSE(Handshaker.java:187)
at com.sun.net.ssl.internal.ssl.Handshaker.fatalSE(Handshaker.java:181)
at com.sun.net.ssl.internal.ssl.ClientHandshaker.serverCertificate(ClientHandshaker.java:975)
at com.sun.net.ssl.internal.ssl.ClientHandshaker.processMessage(ClientHandshaker.java:123)
at com.sun.net.ssl.internal.ssl.Handshaker.processLoop(Handshaker.java:516)
at com.sun.net.ssl.internal.ssl.Handshaker.process_record(Handshaker.java:454)
at com.sun.net.ssl.internal.ssl.SSLSocketImpl.readRecord(SSLSocketImpl.java:884)
at com.sun.net.ssl.internal.ssl.SSLSocketImpl.performInitialHandshake(SSLSocketImpl.java:1096)
at com.sun.net.ssl.internal.ssl.SSLSocketImpl.startHandshake(SSLSocketImpl.java:1123)
at com.sun.net.ssl.internal.ssl.SSLSocketImpl.startHandshake(SSLSocketImpl.java:1107)
at sun.net.www.protocol.https.HttpsClient.afterConnect(HttpsClient.java:405)
at sun.net.www.protocol.https.AbstractDelegateHttpsURLConnection.connect(AbstractDelegateHttpsURLConnection.java:166)
at sun.net.www.protocol.http.HttpURLConnection.getInputStream(HttpURLConnection.java:977)
at java.net.HttpURLConnection.getResponseCode(HttpURLConnection.java:373)
at sun.net.www.protocol.https.HttpsURLConnectionImpl.getResponseCode(HttpsURLConnectionImpl.java:318)
Caused by: java.security.cert.CertificateException: No subject alternative DNS name matching media.mydrifts.com.s3.amazonaws.com found.
at sun.security.util.HostnameChecker.matchDNS(HostnameChecker.java:193)
at sun.security.util.HostnameChecker.match(HostnameChecker.java:77)
at com.sun.net.ssl.internal.ssl.X509TrustManagerImpl.checkIden
tity(X509TrustManagerImpl.java:264)
at com.sun.net.ssl.internal.ssl.X509TrustManagerImpl.checkServerTrusted(X509TrustManagerImpl.java:250)
at com.sun.net.ssl.internal.ssl.ClientHandshaker.serverCertificate(ClientHandshaker.java:954)

And here is what happens in wget:

$ wget -nv https://media.mydrifts.com.s3.amazonaws.com/someContent.txt
ERROR: Certificate verification error for media.mydrifts.com.s3.amazonaws.com: unable to get local issuer certificate
ERROR: certificate common name `*.s3.amazonaws.com' doesn't match requested host name `media.mydrifts.com.s3.amazonaws.com'.
To connect to media.mydrifts.com.s3.amazonaws.com insecurely, use `--no-check-certificate'.
Unable to establish SSL connection.

Requesting the https URL using the DNS CNAME images.mydrifts.com results in the same errors, with the messages saying that the certificate *.s3.amazonaws.com does not match the requested host name images.mydrifts.com.

Notice that the browsers and wget clients offer a way to circumvent the mis-matched SSL certificate. You could, theoretically, ask your users to add an exception to the browser’s security settings. However, most web users are scared off by a “This Connection is Untrusted” message, and will turn away when confronted with that screen.

How to Access S3 via https URLs

As pointed out above, there are two forms of S3 URLs that work with https:

https://s3.amazonaws.com/mybucket.mydomain.com/myObjectKey

and this:

https://simplebucketname.s3.amazonaws.com/myObjectKey

So, in order to get https to work seamlessly with your S3 buckets, you need to either:

  • choose a bucket whose name contains no periods and use the virtual host URL, such as https://simplebucketname.s3.amazonaws.com/myObjectKey or
  • use the URL form that specifies the bucket name separately, after the host name, like this: https://s3.amazonaws.com/mybucket.mydomain.com/myObjectKey.

Update 25 Aug 2009: For buckets created via the CreateBucketConfiguration API call, the only option is to use the virtual host URL. This is documented in the S3 docs here.

Categories
Cloud Developer Tips

Elastic Load Balancer: An Elasticity Gotcha

If you use AWS’s Elastic Load Balancer to allow your EC2 application to scale, like I do, then you’ll want to know about this gotcha recently reported in the AWS forums. By all appearances, it looks like something that should be fixed by Amazon. Until it is, you can reduce (but not eliminate) your exposure to this problem by keeping a small TTL for your ELB’s DNS CNAME entry. Read on for details.

The Gotcha

As your ELB-balanced application experiences an increasing load, some of the traffic received by your back-end instances may be traffic that does not belong to your application. And, after your application experiences a sustained heavy load and then traffic subsides, some of your application’s traffic may be lost or misdirected to other EC2 instances that are not yours.

Update March 2010: It appears AWS has changed the behavior of ELB so this is no longer a likely issue. See below for more details.

Why it Happens

In my article about how ELB works, I describe how ELB resolves its DNS name to a pool of IP addresses, and that this pool increases and decreases in size according to the load placed on the service. Each of the IP addresses in the pool is a “virtual appliance”, acting as a load balancer to distribute the connections among your back-end instances. This gives ELB two levels of elasticity: the pool of virtual appliance IP addresses, and your pool of back-end instances.

Before they are assigned to a specific ELB, the virtual appliance IP addresses are available for use by any ELB, waiting in a global pool. When an ELB needs to increase its pool of virtual appliances due to load, it gets a new IP address from the global pool and begins resolving the ELB DNS name to that IP address in addition to the ones it already uses. And when an ELB notices decreasing load, it releases one of its virtual appliance IP addresses back to the global pool, and no longer returns that IP address when resolving the ELB DNS name. According to testing performed by AWS forum user wizardofcrowds, ELB scales up under sustained load by increasing its pool of IP addresses at the rate of one additional address every 5 minutes. And, ELB scales down by relinquishing an IP address at the rate of one every 2 hours. Thus it is possible that a single ELB virtual appliance IP address can be in service to a number of different ELBs over the course of a few hours.

The problem is that DNS resolution is cached at many layers across the internet. When the ELB scales up and gets a new virtual appliance IP address from the global pool, some client somewhere might still be using that IP address as the resolution of a different ELB’s DNS name. This other ELB might not even belong to you. A few hours ago, another ELB with a different DNS name returned that IP address from a DNS lookup. Now, that IP address is serving your ELB. But some client somewhere may still be using that IP address to attempt to reach an application that is not yours.

The flip side occurs when the ELB scales down and releases a virtual appliance IP address back to the global pool. Some client somewhere might continue resolving your ELB’s DNS name to the now-relinquished IP address. When the address is returned to the pool, that client’s attempts to connect to your service will fail. If that same virtual appliance IP is then put into service for another ELB, then the client working with the cached but no-longer-current DNS resolution for your ELB DNS name will be directed to the other ELB virtual appliance, and then onward to back-end instances that are not yours.

So your application served by ELB may receive traffic destined for other ELBs during increasing load, and may experience lost traffic during decreasing load.

What is the Solution?

Fundamentally, this issue is caused by badly-configured DNS implementations. Some DNS servers (including those of some major ISPs) ignore the TTL (“time to live”) setting of the original DNS record, and thus end up resolving DNS names to an expired IP address. Some DNS clients (browsers such as IE7, and Java programs by default) also ignore DNS TTLs, causing the same problem. Short of fixing all the misconfigured DNS servers and patching all the IE and Java VMs, however, the issue cannot be solved. So a workaround is the best we can hope for.

You, the EC2 user, can minimize the risk that a well-behaved client will experience this issue. Set up your DNS CNAME entries for the ELB to have a small TTL – 120 seconds is good. This will help for clients whose DNS honors the TTL, but not for clients that ignore TTLs or for clients using DNS servers that ignore TTLs.

Amazon can work around the problem on their end. When an ELB needs to scale up and use a new virtual appliance IP address, that address could remain “reserved” for its use for a longer time. When the ELB scales down and releases the virtual appliance IP address, that address would not be reused by another ELB until the reservation period has expired. This would prevent “recent” ELB virtual appliance IP address from being reused by other ELBs, and reduce the risk of misdirecting traffic.

Update March 2010: SanD@AWS has shared that ELB IP addresses will continue to direct traffic to the ELB for one hour after being withdrawn from that ELB’s DNS pool. Hooray!

It should be noted that DNS caching and TTLs influence all load balancing solutions that rely on DNS (such as round-robin DNS), so this issue is not unique to ELB. Caching DNS entries is a good thing for the internet in general, but not all implementations honor the TTL of the cached DNS records. Services relying on DNS for scalability need to be designed with this in mind.

Categories
Cloud Developer Tips

Mount an EBS Volume Created from Snapshot at Startup

There are many posts about how to mount an EBS volume to your EC2 instance during the startup process. But requiring an instance to use a specific EBS volume has limitations that make the technique unsuitable for large-scale use. In this article I present a more flexible technique that uses an EBS snapshot instead.

Update December 2009: Amazon released native support for automatically mounting EBS volumes created from a snapshot, as part of supporting the boot-from-EBS feature. The techniques in this article are no longer necessary. But they’re cool anyway.


Limitations of Mounting an EBS Volume on Instance Startup

Mounting an EBS volume at startup is relatively straightforward (see the above-referenced posts for details). The main features of the procedure are:

  • The instance uses the EC2 API tools to attach the specified EBS volume. These tools, in turn, require Java and your EC2 credentials – your certificate and private key.
  • Ideally, the AMI contains a hook to allow the EBS volume ID to be specified dynamically at startup time, either as a parameter in the user-data or retrieved from S3 or SimpleDB.
  • The AMI should already contain (or its startup scripts should create) the appropriate references to the necessary locations on the mounted EBS volume. For example, if the volume is mounted at /vol, then /var/lib/mysql (the default MySQL data directory) might be soft-linked (ln -s) or mount --binded to /vol/var/lib/mysql. Alternatively, the applications can be configured to use the locations on the mounted volume directly.

There are many benefits to mounting an EBS volume at instance startup:

  • Avoid the need to burn a new AMI when the content on the instance’s disks changes.
  • Gain the redundancy provided by an EBS volume.
  • Gain the point-in-time backups provided by EBS snapshots.
  • Avoid the need to store the updated content into S3 before instance shutdown.
  • Avoid the need to copy and reconstitute the content from S3 to the instance during startup.
  • Avoid paying for an instance to be always-on.

But mounting an EBS volume at startup also has important limitations:

  • Instances must be launched in the same availability zone as the EBS volume. EBS volumes are availability-zone specific, and are only usable by instances running in the same availability zone. Large-scale deployments use instances in multiple availability zones to mitigate risk, so limiting the deployment to a single availability zone is not reasonable.
  • There is no way to create multiple instances that each have the same EBS volume attached. When you need multiple instances that each have the same data, one EBS volume will not do the trick.
  • As a corollary to the previous point, it is difficult to create Auto Scaling groups of AMIs that mount an EBS volume automatically because each instance needs its own EBS volume.
  • It is difficult to automate the startup of a replacement instance when the original instance still has the EBS volume attached. Large-scale deployments need to be able to handle failure automatically because instances will fail. Sometimes instances will fail in a not-nice way, leaving the EBS volume attached. Detaching the EBS volume may require manual intervention, which is something that should be avoided if at all possible for large-scale deployments.

These limitations make the technique of mounting an EBS volume at startup unsuitable for large-scale deployments.

The Alternative: Mount an EBS Volume Created from a Snapshot at Startup

Instead of specifying an EBS volume to mount at startup, we can specify an EBS snapshot. At startup the instance creates a new EBS volume from the given snapshot and attaches the new volume to itself. The basic startup flow looks like this:

  1. If there is a volume already attached at the target location, do nothing – this is a reboot. Otherwise, continue to step 2.
  2. Create a new EBS volume from the specified snapshot. This requires the following:
    • Java
    • The EC2 API tools
    • The EC2 account’s certificate and private key
    • The EBS snapshot ID
  3. Attach the newly-created EBS volume and mount it to the mount point.
  4. Restore any filesystem pointers, if necessary, to point to the proper locations beneath the EBS volume’s mount point.

Like the technique of mounting an EBS volume, this technique should ideally support specifying the snapshot ID dynamically at instance startup time, perhaps via the user-data or retrieved from S3 or SimpleDB.

Why Mount an EBS Volume Created from a Snapshot at Startup?

As outlined above, the procedure is simple and it offers the following benefits:

  • Instances need not be launched in the same availability zone as the EBS volume. However, instances are limited to using EBS snapshots that are in the same region (US or EU).
  • Instances no longer need to rely on a specific EBS volume being available.
  • Multiple instances can be launched easily, each of which will automatically configure itself with its own EBS volume made from the snapshot.
  • Costs can be reduced by allowing “duplicate” EBS volumes to be provisioned only when they are needed by an instance. “Duplicate” EBS volumes are created on demand, and can also (optionally) be deleted during instance termination. Previously, you needed to keep around as many EBS volumes as the maximum number of simultaneous instances you would use.
  • Large-scale deployments requiring content on an EBS volume are easy to build.

Here are some cool things that are made possible by this technique:

  • MySQL replication slave (or cluster member) launching can be made more efficient. By specifying a recent snapshot of the master database’s EBS volume, the new MySQL slave instance will begin its life already containing most of the data. This slave will demand fewer resources from the master instance and will take less time to catch-up to the master. If you do plan to use this technique for launching MySQL slaves, see Eric Hammond’s article on EBS snapshots of a MySQL slave database in EC2 for some sage words of advice.
  • Auto Scaling can launch instances that mount content stored in EBS at startup. If the auto-scaled instances all need to access common content that is stored in EBS, this technique allows you to duplicate that content onto each auto-scaled instance automatically. And, if the instance gets the snapshot ID from its user-data at startup, you can easily change the snapshot ID for auto-scaled instances by updating the launch configuration.

I am currently exploring how to combine this technique with the one discussed in my article about how to boot the entire instance from an EBS volume. Combining these approaches could provide the ability to “boot from a snapshot”, allowing you relate to bootable snapshots the same way you think about AMIs. Stay tuned to this blog for an article on this approach.

Caveats

Sounds great, huh? Despite these benefits, this technique can introduce a new problem: too many EBS volumes. As you may know, AWS limits the number of EBS volumes you can create to 20 (initially, and you can request a higher limit). This technique creates a new EBS volume each time an instance starts up, so your account will accumulate many EBS volumes. Plus, each volume will be almost indistinguishable from the others, mak
ing them difficult to track.

One potential way to distinguish the EBS volumes would be the ability to tag them via the API: Each instance would tag the volume upon creation, and these tags would be visible in the management interface to provide information about the origin of the volume. Unfortunately the EC2 API does not offer a way to tag EBS volumes. Until that feature is supported, use the ElasticFox Firefox extension to tag EBS volumes manually. I find it helpful to tag volumes with the creating instance’s ID and the instance’s “tag” security groups (see my article on using security groups to tag instances). ElasticFox displays the snapshot ID from which the volume was created and its creation timestamp, which are also useful to know.

As already hinted at, you will still need to think about what to do when the newly-created EBS volumes are no longer in use by the instance that created them. If you know you won’t need them, have a script to detach and delete the volume during instance shutdown (but not shutdown-before-reboot). Be aware that if an instance fails to terminate nicely the attached EBS volume may still exist and you will be charged for it.

In any case, make sure you keep track of your EBS volumes because the cost of keeping them around can add up quickly.

How to Mount an EBS Volume Created from a Snapshot on Startup

Now for the detailed instructions. Please note that the instructions below have been tested on Ubuntu 8.04, and should work on Debian or Ubuntu systems. If you are running a Red Hat-based system such as CentOS then some of the procedure may need to be adjusted accordingly.

There are four parts of getting set up:

  • Setting up the Original Instance with an EBS volume
  • Creating the EBS Snapshot
  • Preparing the AMI
  • Launching a New Instance

In the last step the new instance will create a new volume from the specified snapshot and mount it during startup.

Setting Up the Original Instance with an EBS volume

[Note: this section is based on the fine article about runing MySQL with EBS by Eric Hammond.]

Start out with an EC2 instance booted from an AMI that you like. I recommend one of the Alestic Ubuntu Hardy 8.04 Server AMIs. The instance will be assigned an instance ID (in this example i-11111111) and a public IP address (in this example 1.1.1.1).

ec2-run-instances -z us-east-1a --key MyKeypair ami-0772946e

ec2-describe-instances i-11111111

Once the ec2-describe-instances output shows that the instance is running, continue by creating an EBS volume. This command creates a 1 GB volume in the us-east-1a availability zone, which is the same zone in which the instance was launched. The volume will be assigned a volume ID (in this example vol-00000000).

ec2-create-volume -z us-east-1a -s 1
ec2-describe-volumes vol-0000000

Once the ec2-describe-volumes output shows that the volume is available, attach it to the instance:

ec2-attach-volume -d /dev/sdh -i i-11111111 vol-0000000

Next we can log into the instance and set it up. The following will install MySQL and the XFS filesystem drivers, and then mount and format the EBS volume. When prompted, specify a MySQL root password. If you are running a Canonical Ubuntu AMI you need to change the ssh username from root to ubuntu in these commands.

ssh -i id_rsa-MyKeypair root@1.1.1.1

sudo apt-get update && sudo apt-get upgrade -y
sudo apt-get install -y xfsprogs mysql-server
sudo modprobe xfs
sudo mkfs.xfs /dev/sdh
sudo mount -t xfs -o noatime /dev/sdh /vol
sudo mkdir /vol
sudo mount /vol

The EBS volume is now attached and formatted and MySQL is installed, so now we configure MySQL to use the EBS volume for its data, configuration, and logs:

sudo /etc/init.d/mysql stop
# Due to a minor MySQL bug this may be necessary - does not hurt
sudo killall mysqld_safe
export EBS_MOUNT_DIR=/vol
export EBS_EXPORTS="/etc/mysql /var/lib/mysql /var/log/mysql"
for i in $EBS_EXPORTS
do
EBS_MOUNTED_EXPORT_DIR="$EBS_MOUNT_DIR""$i"
sudo mkdir -p `dirname "$EBS_MOUNTED_EXPORT_DIR"`
sudo mv $i `dirname "$EBS_MOUNTED_EXPORT_DIR"`
sudo mkdir $i
sudo mount --bind
"$EBS_MOUNTED_EXPORT_DIR" "$i"
done
sudo /etc/init.d/mysql start
# Needed later to hold our credentials for bundling an AMI
sudo -H mkdir ~/.ec2

Before we go on, we’ll make sure the EBS volume is being used by MySQL. The data directory on the EBS volume is /vol/var/lib/mysql so we should expect new databases to be created there.

mysql -u root -p -e create database db_on_ebs"
ls -l /vol/var/lib/mysql/

The listing should show that the new directory db_on_ebs was created. This proves that MySQL is using the EBS volume for its data store.

Creating the EBS Snapshot

All the above steps prepare the original instance and the EBS volume for being snapshotted. The following procedure can be used to snapshot the volume.

On the instance perform the following to stop MySQL and unmount the EBS volume:

sudo /etc/init.d/mysql stop
sudo umount /etc/mysql
sudo umount /var/log/mysql
sudo umount /var/lib/mysql
sudo umount /vol

Then, from your local machine, create a snapshot as follows. Remember the snapshot ID for later (snap-00000000 in this example).

ec2-create-snapshot vol-00000000

The snapshot is in progress and you can check its status with the ec2-describe-snapshots command.

Preparing the AMI

At this point in the procedure we have the following set up already:

  • an instance that uses an EBS volume for MySQL files.
  • an EBS volume attached to that instance, having the MySQL files on it.
  • an EBS snapshot of that volume.

Now we are ready to prepare the instance for becoming an AMI. This AMI, when launched, will be able to create a new EBS volume from the snapshot and mount it at startup time.

First, from your local machine, copy your credentials to the EC2 instance:

scp -i id_rsa-MyKeypair pk-whatever1234567890.pem cert-whatever1234567890.pem root@1.1.1.1:~/.ec2/

Back on the EC2 instance install Java (skipping the annoying interactive license agreement) and the EC2 API tools:

export DEBIAN_FRONTEND=noninteractive
echo sun-java6-jdk shared/accepted-sun-dlj-v1-1 select true | sudo /usr/bin/debconf-set-selections
echo sun-java6-jre shared/accepted-sun-dlj-v1-1 select true | sudo /usr/bin/debconf-set-selections
sudo -E apt-get install -y unzip sun-java6-jdk
sudo -H wget -O ~/ec2-api-tools.zip http://s3.amazonaws.com/ec2-downloads/ec2-api-tools.zip && \
cd ~ && unzip ec2-api-tools.zip && ln -s ec2-api-tools-1.3-36506 ec2-api-tools

Note: Future versions of the EC2 API tools will have a different version number, and the above command will need to change accordingly.

Next, set up the script that does the create-volume-and-mount-it magic at startup. Download it from here with the following command:

sudo curl -Lo /etc/init.d/create-ebs-vol-from-snapshot-and-mount \
https://sites.google.com/site/shlomosfiles/clouddevelopertips/create-ebs-vol-from-snapshot-and-mount?attredirects=0

The script has a number of items to customize:

  • The EC2 account credentials: Put a pointer to your private key and certificate file into the script in the appropriate place. If you followed the above instructions these will be in /root/.ec2. Make sure the credentials are located on the instance’s root partition in order to ensure the keys are bundled into the AMI.
  • The snapshot ID. This too can either be hard-coded into the script or, even better, provided as part of the user-data. It is controlled by the EBS_VOL_FROM_SNAPSHOT_ID setting. See below for an example of how to specify and override this value via the user-data.
  • The JAVA_HOME directory. This is the location of the Java installation. On most linux distributions this should point to /usr/lib/jvm/java-6-sun .
  • The EC2_HOME directory. This is the location where the EC2 API tools are installed. If you followed the procedure above this will be /root/ec2-api-tools .
  • The device attach point for the EBS volume. This is controlled by the EBS_ATTACH_DEVICE setting, and is /dev/sdh in these instructions.
  • The filesystem mount directory for the EBS volume. This is controlled by the EBS_MOUNT_DIR setting, and is /vol in these instructions.
  • The directories to be exported from the EBS volume. These are the directories that will be “mapped” to the root filesystem via mount --bind. These are specified in the EBS_EXPORTS setting.
  • If you are creating an AMI for the EU region, uncomment the line export EC2_URL=https://eu-west-1.ec2.amazonaws.com by removing the leading #.

Once you customize the script, set it up to run upon startup as follows:

sudo chmod +x /etc/init.d/create-ebs-vol-from-snapshot-and-mount
sudo update-rc.d create-ebs-vol-from-snapshot-and-mount start S 89 .

As mentioned above, if you do not want the newly-created EBS volume to persist after the instance terminates you can configure the script to be run on shutdown, allowing it to delete the volume. One way of doing this is to create the AMI with a shutdown hook already in place. To do this:

sudo ln -s /etc/init.d/create-ebs-vol-from-snapshot-and-mount /etc/rc0.d/K32create-ebs-vol-from-snapshot-and-mount

Alternatively, you can defer this decision to instance launch time, by passing in the above command via a user-data script – see below for more on this.

Remember: Running this script as part of the shutdown process as described above will delete the EBS volume. If you do not want this to happen automatically, don’t execute the above command. If you mistakenly ran the above command you can fix things as follows:

sudo rm /etc/rc0.d/K32create-ebs-vol-from-snapshot-and-mount

Next is a little cleanup before bundling:

# New instances need their own host keys generated at first boot
chmod +x ec2-ssh-host-key-gen
# New instances should not contain leftovers from this instance
sudo rm -f /root/.*hist*
sudo rm -f /var/log/*.gz
sudo find /var/log -name mysql -prune -o -type f -print | \
while read i; do sudo cp /dev/null $i; done

The instance is now ready to be bundled into an AMI, uploaded, and registered. The commands below show this process. For more about the considerations when bundling an AMI see the this article by Eric Hammond.

bucket=com.mybucket.images
prefix=ubuntu-hardy-32bit-attach-snapshot-at-startup-for-mysql-20090805
export AWS_USER_ID=MY-USER-ID
export AWS_ACCESS_KEY_ID=MY-ACCESS-KEY
export AWS_SECRET_ACCESS_KEY=MY-SECRET-ACCESS-KEY
arch=i386

sudo -E ec2-bundle-vol \
-r $arch \
-d /mnt \
-p $prefix \
-u $AWS_USER_ID \
-k ~/.ec2/pk-*.pem \
-c ~/.ec2/cert-*.pem \
-s 10240 \
-e /mnt,/tmp,/root/.ssh
ec2-upload-bundle \
-b $bucket \
-m /mnt/$prefix.manifest.xml \
-a $AWS_ACCESS_KEY_ID \
-s $AWS_SECRET_ACCESS_KEY

Once the bundle has uploaded successfully, register it from your local machine as follows:

bucket=com.mybucket.images
prefix=ubuntu-hardy-32bit-attach-snapshot-at-startup-for-mysql-20090805
ec2-register $bucket/$prefix.manifest.xml

The ec2-register command displays an AMI ID (ami-012345678 in this example).

We are finally ready to test it out!

Launching a New Instance

Now we are ready to launch a new instance that creates and mounts an EBS volume from the snapshot. The snapshot ID is configurable via the user-data payload specified at instance launch time. Here is an example user-data payload showing how to specify the snapshot ID:

EBS_VOL_FROM_SNAPSHOT_ID=snap-00000000

Note that the format of the user-data payload is compatible with the Running User-Data Scripts technique – just make sure the first line of the user-data payload begins with a hashbang #! and that the EBS_VOL_FROM_SNAPSHOT_ID setting is located somewhere in the payload, at the beginning of a line.

Launch an instance of the AMI with the user-data specifying the snapshot ID, in a different availability zone. The instance will be assigned an instance ID (in this example i-22222222) and a public IP address (in this example 2.2.2.2).

ec2-run-instances -z us-east-1c --key MyKeypair \
-d "EBS_VOL_FROM_SNAPSHOT_ID=snap-00000000" ami-012345678

ec2-describe-instances i-22222222

Once the ec2-describe-instances output shows that the instance is running, check for the new EBS volume that should have been created from the snapshot (in this example, vol-22222222) in the new availability zone.

ec2-describe-volumes

Finally, ssh into the instance and verify that it is now working from the new EBS volume:

ssh -i id_rsa-MyKeypair root@2.2.2.2

mysql -u root -p -e “show databases”

You should see the db_on_ebs database in the results. This demonstrates that the startup sequence successfully created a new EBS volume, attached and mounted it, and set itself up to use the MySQL data on the EBS volume.

Cleaning Up

Don’t forget to clean up the pieces of this procedure when you no longer need them:

# the original instance
ec2-terminate-instances i-11111111
# the original EBS volume
ec2-delete-volumes vol-00000000
# the instance that created a new volume from the snapshot
ec2-terminate instances i-22222222

If you set up the shutdown hook to delete the EBS volume then you can verify that this works by checking that the ec2-describe-volumes output no longer contains the new EBS volume. Otherwise, delete it manually:

# the new volume created from the snapshot
ec2-delete-volumes vol-22222222

And don’t forget to un-register the AMI and delete the files from S3 when you are done. These steps are not shown.

Making Changes to the Configuration

Now that you have a configuration using EBS snapshots which is easily scalable to any availability zone, how do you make changes to it?

Let’s say you want to add a web server to the AMI and your web server’s static content to the EBS volume. (I generally don’t recommend storing your web-layer data in the same place as your database storage, but this example serves as a useful illustration.) You would need to do the following:

  1. Launch an instance of the AMI specifying the snapshot ID in the user-data.
  2. Install the web server on the instance.
  3. Put your web server’s static content onto the instance (perhaps from S3) and test that the web server works.
  4. Stop the web server.
  5. Move the web server’s static content to the EBS volume.
  6. mount --bind” the EBS locations to the original directories without adding entries to /etc/fstab.
  7. Restart the web server and test that the web server still works.
  8. Edit the startup script, adding entries for the web server’s directories to EBS_EXPORTS.
  9. Stop the web server and unmount (umount) all the mount bind directories and the EBS volume.
  10. Remove the mount bind and /vol entries for the EBS exported directories from /etc/fstab.
  11. Perform the cleanup prior to bundling.
  12. Bundle and upload the new AMI.
  13. Create a new snapshot of the EBS volume.
  14. Change your deployment configurations to start using the new AMI and the new snapshot ID.

If you decide that you would like the automatically-created EBS volumes to be deleted when the instances terminate, you have two ways to do this:

  • Execute this command
    sudo ln -s /etc/init.d/create-ebs-vol-from-snapshot-and-mount \
    /etc/rc0.d/K32create-ebs-vol-from-snapshot-and-mount

    and rebundle the AMI.
  • Pass the above command to the instance via a user-data script. The user-data could also specify the snapshot ID, and might look like this:

    #! /bin/bash
    EBS_VOL_FROM_SNAPSHOT_ID=snap-00000000
    ln -s /etc/init.d/create-ebs-vol-from-snapshot-and-mount \
    /etc/rc0.d/K32create-ebs-vol-from-snapshot-and-mount

The technique of mounting an EBS volume created from a snapshot at startup was born of necessity: I needed a way to allow many instances across availability zones to share the same content which lives on an EBS drive. This article shows how you can apply the technique to your deployments. If you also find this technique useful, please share it in the comments!

Thanks

Eric Hammond reviewed early drafts of this article and provided valuable feedback. Thanks!

Categories
Cloud Developer Tips

EC2 Instance Belonging to Multiple ELBs

I discovered an interesting feature of Amazon EC2 Elastic Load Balancing today: you can add an EC2 instance to more than one ELB virtual appliance. Below I demonstrate the steps I took to set up two ELBs each containing the same instance, and afterward I explain how this technique can be used to deliver different classes of service.

How to Set Up One Instance Belonging to Multiple ELBs

I set this up using the standard EC2 API and EC2 ELB command-line tools. First I launched an instance. I used my favorite Alestic image, the Ubuntu 8.04 Hardy Server AMI:

ec2-run-instances ami-0772946e -k my-keypair -t m1.small -z us-east-1a -n 1

My default security group allows access to port 80, but if yours doesn’t you will need to either change it (for this experiment) or use a security group that does allow port 80. Once my instance was running I sshed in (you should use your own instance’s public DNS name here):

ssh -i /Users/shlomo/.ssh/id_rsa-my-keypair root@ec2-67-202-31-50.compute-1.amazonaws.com

In the ssh session, I installed the Apache 2 web server:

apt-get update && apt-get install -y apache2

Then I tested it out from my local machine:

wget -q -O - http://ec2-67-202-31-50.compute-1.amazonaws.com/index.html

The result, showing the HTML It works! means Apache is accessible on the instance.

Next, to set up two load balancers. On my local machine I did this:

elb-create-lb lbOne --availability-zones us-east-1a --listener "protocol=http,lb-port=80,instance-port=80"

Output:

DNS-NAME lbOne-1123463794.us-east-1.elb.amazonaws.com

elb-create-lb lbTwo --availability-zones us-east-1a --listener "protocol=http,lb-port=80,instance-port=80"

Output:

DNS-NAME lbTwo-108037856.us-east-1.elb.amazonaws.com

Once the load balancers were created, I added the instance to both as follows:

elb-register-instances-with-lb lbOne --instances i-0fdcda66

Output:

INSTANCE-ID i-0fdcda66

elb-register-instances-with-lb lbTwo --instances i-0fdcda66

Output:

INSTANCE-ID i-0fdcda66

Okay, EC2 accepted that API call. Next, I tested that it actually works, directing HTTP traffic from both ELBs to that one instance:

wget -q -O - http://lbOne-1123463794.us-east-1.elb.amazonaws.com/index.html
wget -q -O - http://lbTwo-108037856.us-east-1.elb.amazonaws.com/index.html

Both commands produce It works!, the same as when we accessed the instance directly. This shows that multiple ELBs can direct traffic to a single instance.

What Can This Be Used For?

Here are some of the things you might consider doing with this technique.

Creating different tiers of service

Using two different ELBs that both contain (some of) the the same instance(s) can be useful to create different classes of service without using dedicated instances for the lower service class. For example, you might offer a “best-effort” service with no SLA to non-paying customers, and offer an SLA with performance guarantees to paying customers. Here are example requirements:

  • Paid requests must be serviced within a certain minimum time.
  • Non-paid requests must not require dedicated instances.
  • Non-paid requests must not utilize more than a certain number (n) of available instances.

To build a system that fulfills these requirements you can set up two ELBs, one for each class of service (and direct traffic appropriately). The paying-tier ELB contains n instances at first, and the free-tier ELB contains those very same n instances. You can then set up Auto Scaling for the paying-tier ELB, allowing it to scale based on average CPU or average latency across the paying-tier ELB. This would allow the paying-tier service to scale up and down with demand, but always leaving the original n instances in the paying-tier ELB pool, and always limiting the free-tier to using those n instances. And, all this is done without requiring separate instances for the free-tier ELB.

(“Huh?” you say. “Won’t Auto Scaling terminate the original n instances that were in the paying-tier ELB pool?” No. Auto Scaling does not consider instances that were already in an ELB when the Auto Scaling group was created. As soon as I find this documented I’ll add the source here. In the meantime, trust me, it’s true.)

Splitting traffic across multiple destination ports

The ELB forwarding specification is called a listener. A listener is the combination of source-port, protocol type (HTTP or TCP), and the destination port: it describes what is forwarded and to where. In the above demonstration I created two ELBs that both have the same listener, forwarding HTTP/80 to port 80 on the instance. But the ELBs can also be configured to forward HTTP/80 traffic to different destination ports. Or, the the ELBs can be configured to forward traffic from different source ports to the same destination port. Or from different source ports to different destination ports. Here’s a diagram depicting the various possible combinations of listeners:
Different combinations of ELB listeners that might make sense together

As the table above shows, there are only a few combinations of listeners. Two listeners that are the same (1 -> 1, 1 -> 1 and 1-> 2, 1 -> 2) are redundant (more on this below), possibly only making sense as explained above to provide different classes of service using the same instances. Two listeners forwarding the same source port to different destination ports (1 -> 1, 1 -> 2) can only be achieved with two ELBs. Two listeners that “merge” different source ports into the same destination port (1 -> 1, 2 -> 1 and 1 -> 2, 2 -> 2) can be done with a single ELB. So can two listeners that “swap” source ports and destination ports between them (1 -> 2, 2 -> 1). So can two listeners that map
different source ports to different destination ports (1 -> 1, 2 -> 2).

Did you notice it? I said “can be done with a single ELB”. Did you know you can have multiple listeners on a single ELB? It’s true. If we wanted to forward a number of different source ports all to the same destination port we could accomplish that without creating multiple ELBs. Instead we could create an ELB with multiple listeners. Likewise, if we wanted to forward different source ports to different destination ports we could do that with multiple listeners on a single ELB – for example, using the same ELB with two listeners to handle HTTP/80 and TCP/443 (HTTPS). Likewise, swapping source and target ports with two listeners can be done with a single ELB. What you can’t do with a single ELB is split traffic from a single source port to multiple destination ports. Try it – the EC2 API will reject an attempt to build a load balancer with multiple listeners sharing the same source port:

elb-create-lb lbOne --availability-zones us-east-1a --listener "protocol=http,lb-port=80,instance-port=80" --listener "protocol=http,lb-port=80,instance-port=8080"

Output:

elb-create-lb: Malformed input-Malformed service URL: Reason:
elasticloadbalancing.amazonaws.com - https://elasticloadbalancing.amazonaws.com
Usage:
elb-create-lb
LoadBalancerName --availability-zones value[,value...] --listener
"protocol=value, lb-port=value, instance-port=value" [ --listener
"protocol=value, lb-port=value, instance-port=value" ...]
[General Options]
For more information and a full list of options, run "elb-create-lb --help"

Granted, the error message misidentifies the problem, but it will not work.

Where does that leave us? The only potentially useful case for using two separate ELBs for multiple ports, with the same instance(s) behind the scenes, is where you want to split traffic from a single source port across different destination ports on the instance(s). Practically speaking, this might make sense as part of implementing different classes of service using the same instances. In any case, it would require differentiating the traffic by address (to direct it to the appropriate ELB), so the fact that the actual destination is on a different port is only mildly interesting.

Redundancy – Not.

Putting the same instance behind multiple load balancers is a technique used with hardware load balancers to provide redundancy: in case one load balancer fails, the other is already in place and able to take over. However, EC2 Elastic Load Balancers are not dedicated hardware, and they may not fail independently of each other. I say “may not” because there is not much public information about how ELB is implemented, so nobody who is willing to talk knows how independent ELBs are of each other. Nevertheless, there seems to be no clear redundancy benefits from placing one EC2 instance into multiple ELBs.

With Auto Scaling – Maybe, but why?

This technique might be able to circumvent a limitation inherent in Auto Scaling groups: an instance may only belong to a single Auto Scaling group at a time. Because Auto Scaling groups can manage ELBs, you could theoretically add the same instance to both ELBs, and then create two Auto Scaling groups, one managing each ELB. Your instance will be in two Auto Scaling groups.

Unfortunately you gain nothing from this: as mentioned above, Auto Scaling groups ignore instances that already existed in an ELB when the Auto Scaling group was created. So, it appears pointless to use this technique to circumvent the Auto Scaling limitation.

[The Auto Scaling limitation makes sense: if an instance is in more than one Auto Scaling group, a scaling activity in one group could decide to terminate that shared instance. This would cause the other Auto Scaling group to launch a new instance immediately to replace the shared instance that was terminated. This “churn” is prevented by forbidding an instance from being in more than one Auto Scaling group.]

In short, the interesting feature of ELB allowing an instance to belong to more than one ELB at once has limited practical applicability, useful to implement different service classes using the same instances. If you encounter any other useful scenarios for this technique, please share them.

Update 24 December 2009: You can use multiple ELBs with the same instances to provide multiple HTTPS sites on the same instance.

Categories
Cloud Developer Tips

The EC2 Instance Life Cycle

Working with virtual infrastructure is not a whole lot different than using real hardware, but it’s easy to get confused when things are different. In this article I’ll take a look at the life cycle of Amazon EC2 instances and how it differs from the traditional life cycle of real computers.

Update January 2010: This article has been updated to incorporate new options introduced by the Boot-from-EBS feature.

The Life Cycle of “Real” Computers

By “life cycle” I mean “the different stages that a computer goes through from power-on to power-off”. This is best explained with a diagram:

Real computers begin their service lives “off”. Someone hits the power button and the computers start booting up, eventually settling into a “running” state. From there they can be rebooted, hibernated, suspended, or shut-down normally. (Of course, something abnormal can happen, such as a power failure, which would cause the machine to immediately return to the “off” state. This is not represented in the diagram above.)

The diagram highlights two important features of the life cycle of real computers:

  1. Real computers cost you money even when they are not in use. Of course they consume power when they are on, and you pay for that power. But even when they are off they cost money, if only for the space that they occupy. This is represented in the diagram by the green box: real computers cost you money no matter if they are in use or not.
  2. Even when they are “off”, real computers remain yours. The information stored on their hard drives stays there, waiting to be accessed the next time the machine is powered on. This is represented by the arrows leading into and exiting the “off” state: even if you turn a computer off, you can still turn it on again.

The Life Cycle of EC2 Instances

The above two features of real computers, costing money and being yours to control, are different for virtual computers in the cloud. Different clouds have different features, and in Amazon EC2 there are two different ways of booting up an instance. Depending on which boot method you use you get different life cycle models. You can boot from an S3-backed AMI (also called an instance store AMI), or from an EBS-backed AMI. (The pros and cons of each kind of AMI are beyond the scope of this article.)

When you boot from an S3-backed AMI the instance life cycle looks like this:

S3-backed AMI instances begin their lives when you launch them (such as with the ec2-run-instances command). They spend some time in the “pending” state, waiting for the reservation to be fulfilled. Once the instances have begun to boot they are in the “running” state. Here they will stay until they are terminated (such as with the ec2-terminate-instances command), which causes the instances to begin “shutting down”, ending with the instances being “terminated”.

EBS-backed AMIs have a life cycle more similar to that of real computers:

EBS-backed AMI instances begin their lives when launched, spending some time in the “pending” state until the order is fulfilled. When the instances start booting they are “running”. From there they can be rebooted or shut down, like S3-backed AMI instances. They can also be “stopped” (such as with the ec2-stop-instances command), from which they can be started again (e.g. with the ec2-start-instances command) or terminated.

The above diagrams illustrate how EC2 instances are different than real computers as far as costing money and being yours to control is concerned:

  1. EC2 instances only cost money when they are “running”. You do not pay for instance-hours for pending, stopped, shutting down, or terminated instances. This is represented in the diagrams by the green box, which only surrounds the “running” state. This is unlike real computers, which cost money even when they are hibernating or powered off. EC2 instances that are “stopped” are not charged for any instance-hours, but the attached EBS volumes still do cost money. This is represented by the purple box, which surrounds both the “running” and “stopped” states. Note that, by default, EBS-backed AMI instances delete the associated EBS boot volume when they are terminated, so the cost of the EBS boot volume is not incurred once the instance terminates. This behavior can be changed at launch time, leaving the associated EBS volume intact even after the instance terminates. This situation is not illustrated, but in this case the EBS volume costs money until it is deleted.
  2. You control instances that are “running” and “stopped” – you can attach and detach EBS volumes from them (but you can’t detach the boot volume from an EBS-backed AMI instance that is “running”). But, once an EC2 instance has begun “shutting down”, you no longer control it. In the diagrams above there is no way to get an instance from “shutting down” back to “running”. This means that you cannot get back an instance that was terminated – the data stored on that computer’s local disks (“ephemeral storage”) can not be retrieved. Real computers, on the other hand, are still controlled by you when they are not running – all you need to do to access their data is to power them on.

Follow-on Questions

If the data that you place on the “ephemeral storage” of an EC2 instance is no longer accessible once you terminate it, what happens to the data? Specifically:

  • What processes does Amazon have in place to make sure that the ephemeral storage drives do not present a privacy risk, allowing other instances possibly belonging to other people to see the data left over on the ephemeral drives you have relinquished?
  • What can you do to mitigate the privacy risk of your leftover data on ephemeral storage, without relying on Amazon to do it for you?

If you can’t restart a terminated instance and you can’t access the data on a terminated instance, how do you accomplish in the EC2 cloud all the “usual” things that you do with real computers? Specifically:

  • How do you keep data and applications in EC2 without keeping an instance running? (Hint: use EBS-backed AMIs and “stop” & “start” the instances as needed.)
  • How do you make sure that your data and applications can be easily restored if your instance terminates unexpectedly?

And, what does an AMI have to do with the life cycle model? What about the life cycle model changes if you bundle your instance into an AMI? (Spoiler: nothing).

These questions will be the subject of future articles, so stay tuned.

Categories
Cloud Developer Tips

Copying ElasticFox Tags from One Browser to Another

The ElasticFox Firefox extension allows you to tag EC2 instances, EBS volumes, EBS snapshots, Elastic IPs, and AMIs. ElasticFox’s tags are stored locally within Firefox, so if you use ElasticFox from more than one browser your tags from one browser are not visible in any other browser. In this article I demonstrate how to copy tags from one ElasticFox installation to another.

Where Are ElasticFox Tags Stored?

My article about Tagging EC2 Instances Using Security Groups shows a brief walkthrough of using ElasticFox to tag instances. Under the hood, ElasticFox stores tags in the prefs.js file within your Firefox Profile directory. But instead of poking around in there directly, take a look at Firefox’s built-in interface to these preferences. It’s the about:config screen, and you get there by typing about:config into the address bar:

The Firefox about:config screen

Click “I’ll be careful, I promise!” Up comes the about:config screen, with all sorts of interesting-looking settings. We’re interested in the ElasticFox tags only, so type ec2ui.*tag in the Filter field, and the result looks like this:

Viola! The ElasticFox tags are stored here.

Viola! Those are the ElasticFox tags that I’ve set up.

Copying ElasticFox Tags to Another Browser Manually

You can copy ElasticFox tags from the about:config screen, via the clipboard, into a text file. First, open the about:config screen and use the Filter as described above to see the relevant settings. Create an empty text file and copy each setting (right-click on the entry and choose “Copy”) and paste it into the text file. Add each setting you want to transfer into the text file. You can email the text file to yourself (or put it on your USB key) and then use the text file to help you change the values of these settings in the target browser’s about:config screen.

Once copied setting looks like this:

ec2ui.eiptags.MyDrifts.us-east-1;({'75.101.15.8':'mydrifts.com'})

The setting’s name is ec2ui.eiptags.MyDrifts.us-east-1 and its value is ({'75.101.15.8':'mydrifts.com'}), separated from the name by a semicolon (;). For each setting you want to transfer to the target browser, select the value (after the semicolon) from the text file and copy it to the clipboard. Then, in the target browser’s about:config screen, right-click on the corresponding setting entry and choose “Modify”, and paste in the new value.

All that selecting and copying and pasting is annoying, and you might make a mistake when entering the values in the target browser. I feel your pain. There must be a better way.

Copying ElasticFox Tags to Another Browser with OPIE

OPIE is a Firefox extension that allows you to import and export preference settings. The good thing about it is that it can be used to export only some settings – and we only want to export the ElasticFox settings. Unfortunately, it does not support ElasticFox!

Please help lobby the OPIE developer to add ElasticFox support by posting in this forum thread – OPIE support would make copying ElasticFox tags (and indeed, entire ElasticFox setups) between browsers much easier.

Copying ElasticFox Tags to Another Browser with Shell Scripts

I’ve put together two shell scripts that can be used to directly export ElasticFox settings from the Firefox prefs.js file and to directly import them back in. These scripts really export and import all your ElasticFox settings, not just tags. Read on for directions on how to use these scripts, which work on Linux, Mac OS X, and Solaris, for Firefox 3.x and above.

A word of caution before you export and import via prefs.js directly: make sure Firefox is not running when you export or import. Firefox overwrites the prefs.js file upon exiting, and reads it upon starting up. In order to make sure all your ElasticFox tags (and all other settings, too) are in the export, Firefox must be closed before exporting. Likewise, in order to make sure Firefox picks up your imported settings you need to make sure it is closed before importing.

How to Export ElasticFox Settings

Here is a handy script to export ElasticFox preferences from Firefox. You can download it, or copy it from here and save it to your local machine:

#! /bin/bash

# the base name of the extension preferences
# that are to be imported
PREF_BASE=ec2ui
# ec2ui is the extension base name of ElasticFox

# backslash-escape special characters as you
# would in a regular expression
# the following command will only escape
# periods (".") but that should suffice
# for firefox extensions
ESCAPED_PREF_BASE=$(echo $PREF_BASE | sed -e "s/\./\\\\./g")

# export desired prefs
egrep "^user_pref\(\"$ESCAPED_PREF_BASE\." prefs.js

Once you save the script locally, make it executable:

chmod +x exportFirefoxPrefs.sh

The script expects to be run in the same directory as the prefs.js file, but it’s most convenient to keep this script in your home directory and create a soft-link there to the prefs.js file. On my machine, the command to make a soft-link to the prefs.js file is this:

ln -s /Users/shlomo/Library/Application\ Support/Firefox/Profiles/f0psntn6.default/prefs.js prefs.js

You’ll need to specify the location of your Firefox profile directory (instead of mine).

Remember to exit Firefox. Now you’re ready to run the export script.

./exportFirefoxPrefs.sh > savedPrefs

This will create a file called savedPrefs containing the ElasticFox settings. Move this file to the target browser’s machine, where we will import it.

How to Import ElasticFox Settings

Here is a script to import to import ElasticFox settings into Firefox. Download it, or copy it from here and save it to your local machine:

#! /bin/bash

WORKFILE=workfile.txt
OUTFILE=newPrefs.js
XFERFILE="$1"

# the base name of the extension preferences
# that are to be imported
PREF_BASE=ec2ui
# ec2ui is the extension base name of ElasticFox

if [ -z "$1" ]
then
  echo "Please provide the filename of the file containing the prefs to import."
else
# backslash-escape any  characters as you would
# in a regular expression
# this command only handles periods
# but that should suffice for firefox extensions
ESCAPED_PREF_BASE=$(echo $PREF_BASE | sed -e "s/\./\\\\./g")

# backup the existing prefs
cp prefs.js prefs.js.old

# get the file header
egrep -v "^user_pref\(" prefs.js > $OUTFILE

# add all other prefs
egrep "^user_pref\(" prefs.js | egrep -v "^user_pref\(\"$ESCAPED_PREF_BASE\." > $WORKFILE

# add desired prefs
cat $XFERFILE >> $WORKFILE

# sort all prefs into output
sort $WORKFILE >> $OUTFILE

# clean up
rm $WORKFILE

# uncomment this when you trust this script
# to replace your prefs automatically
#cp $OUTFILE prefs.js
#rm $OUTFILE
fi

After you save the script locally, make it executable:

chmod +x importFirefoxPrefs.sh

As with the export script above, the import script expects to be run in the same directory as the Firefox prefs.js file, so make a soft-link to the prefs.js file in the same directory as the script (see above).

Once you’ve made sure that Firefox is not running, you’re ready to run the import script:

./importFirefoxPrefs.sh savedPrefs

This will create a file called newPrefs.js in the same directory. newPrefs.js will contain the imported ElasticFox settings from the savedPrefs file, merged with the other already-existing Firefox settings from prefs.js. The script will also create a backup copy of prefs.js called prefs.js.old. All you need to do is to replace your Firefox’s prefs.js with newPrefs.js, as follows:

cp newPrefs.js prefs.js
rm newPrefs.js

Now, restart Firefox. It should contain the ElasticFox settings from the source browser. If anything doesn’t work, simply exit Firefox and restore the previous prefs.js:

cp prefs.js.old prefs.js

Once you are confident that the script works consistently, you can uncomment the last few lines of the script and let it automatically replace Firefox’s prefs.js file by itself – then you do not need to perform that step manually.

This method of copying ElasticFox settings using shell scripts is relatively easy, but not perfect. OPIE would be a friendlier way, and would support Windows as well (so please lobby the developer to support ElasticFox). If you’re looking for your ElasticFox tags to be available via the EC2 APIs, check out my article on using security groups as a way to tag instances (but unfortunately not Elastic IPs, EBS volumes and snapshots, or AMIs).