Categories
Cloud Developer Tips

Poking Holes in CloudFront-Based Sites for Dynamic Content

As of Februrary 2011 AWS S3 has been able to serve static websites, giving you superior availability for unchanging (or seldom-changing) content. But most websites today are not static; dynamic elements drive essential features such as personalized pages, targeted advertisements, and shopping carts. Today’s release from AWS CloudFront: Support for Dynamic Content alleviates some of the challenge of running dynamic websites. You can now configure a custom set of URL patterns to always be passed through to the origin server. This allows you to “poke holes” in the CDN cache for providing dynamic content.

Some web sites, such as this one, appear to be static but are driven by dynamic code. WordPress renders each page on every request. Though excellent tools exist to provide caching for WordPress, these tools still require your web server to process WordPress’s PHP scripts. Heavy traffic or poor hosting choices can still overwhelm your web server.

Poking Holes

It’s relatively easy to configure your entire domain to be served from CloudFront. What do you need to think about when you poke holes in a CloudFront distribution? Here are two important items: admin pages and form actions.

Admin pages

The last thing you want is for your site’s control panel to be statically served. You need an accurate picture of the current situation in order to manage your site. In WordPress, this includes everything in the /wp-admin/* path as well as the /wp-login.php page.

Form actions

Your site most likely does something with the information people submit in forms – search with it, store it, or otherwise process it. If not, why collect it? In order to process the submitted information you need to handle it dynamically in your web application, and that means the submit action can’t lead to a static page. Make sure your form submission actions – such as search and feedback links – pass through to the webserver directly.

A great technique for feedback forms is to use WuFoo, where you can visually construct forms and integrate them into your website by simple Javascipt. This means that your page can remain static – the Javascript code dynamically inserts the form, and WuFoo handles the processing, stops the spam, and sends you the results via email.

When Content Isn’t So Dynamic

Sometimes content changes infrequently – for example, your favicon probably changes rarely. Blog posts, once written, seldom change. Serving these items from a CDN is still an effective way to reduce load on your webserver and reduce latency for your users. But when things do change – such as updated images, additional comments, or new posts, how can you use CloudFront to serve the new content? How can you make sure CloudFront works well with your updated content?

Object versioning

A common technique used to enable updating static objects is called object versioning. This means adding a version number to the file name, and updating the link to the file when a new version is available. This technique also allows an entire set of resources to be versioned at once, when you create a versioned directory name to hold the resources.

Object versioning works well with CloudFront. In fact, it is the recommended way to update static resources that change infrequently. The alternative method, invalidating objects, is more expensive and difficult to control.

Combining the Above Techniques

You can use a combination of the above techniques to create a low-latency service that caches sometimes-dynamic content. For example, a WordPress blog could be optimized by integrating these techniques into the WordPress engine, perhaps via a plugin. Here’s what you’d do:

  • Create a CloudFront distribution for the site, setting its custom origin to point to the webserver.
  • Poke holes in the distribution necessary for the admin, login, and forms pages.
  • Create new versions of pages, images, etc. when they change, and new versions of the pages that refer to them.

Even though WordPress generates each page via PHP, this collection of techniques allows the pages to be served via CloudFront and also be updated when changes occur. I don’t know of a plugin that combines all these techniques, but I suspect the good folks at W3-EDGE, producers of the W3 Total Cache performance optimization framework I mentioned above, are already working on it.

Categories
Cloud Developer Tips

AWS Auto-Scaling and ELB with Reliable Root Domain Handling

Update May 2011: Now that AWS Route 53 can be used to allow an ELB to host a domain zone apex, the technique described here is no longer necessary. Cool, but not necessary.

Someone really has to implement this. I’ve had this draft sitting around ever since AWS announced support for improved CloudWatch alerts and AutoScaling policies (August 2010), but I haven’t yet turned it into a clear set of commands to follow. If you do, please comment.

Background

You want an auto-scaled, load-balanced pool of web servers to host your site at example.com. Unfortunately it’s not so simple, because AWS Elastic Load Balancer can’t be used to host a domain apex (AKA a root domain). One of the longest threads on the AWS Developer Forum discusses this limitation: because ELB utilizes DNS CNAMEs, which are not legal for root domain entries, ELB does not support root domains.

An often-suggested workaround is to use an instance with an Elastic IP address to host the root domain, via standard static DNS, with the web server redirecting all root domain requests to the subdomain (www) served by the ELB. There are four drawbacks to this approach:

  1. The instance with the Elastic IP address is liable to be terminated by auto-scaling, leaving requests to the root domain unanswered.
  2. The instance with the Elastic IP address might fail unnaturally, again leaving requests to the root domain unanswered.
  3. Even when traffic is very low, we need at least two instances running: the one handling the root domain outside the auto-scaled ELB group (due to issue #1) and the one inside the auto-scaled ELB group (to handle the actual traffic hitting the ELB-managed subdomain).
  4. The redirect adds additional latency to requests hitting the root domain.

While we can’t do anything about the fourth issue, what follows is a technique to handle the first three issues.

The Idea

The idea is built on these principles:

  • The instance with the Elastic IP is outside the auto-scaled group so it will not be terminated by auto-scaling.
  • The instance with the Elastic IP is managed using AWS tools to ensure the root domain service is automatically recovered if the instance dies unexpectedly.
  • The auto-scaling group can scale back to zero size, so only a single instance is required to serve low traffic volumes.

How do we put these together?

Here’s how:

  1. Create an AMI for your web server. The AMI will need some special boot-time hooks, which are described below in italics. The web server should be set up to redirect root domain traffic to the subdomain that you’ll want to associate with the ELB, and to serve the subdomain normally.
  2. Create an ELB for the site’s subdomain with a meaningful Health Check (e.g. a URL that exercises representative areas of the application).
  3. Create an AutoScaling group with min=1 and max=1 instances of that AMI. This AutoScaling group will benefit from the default health checks that such groups have, and if EC2 reports the instance is degraded it will be replaced. The LaunchConfiguration for this AutoScaling group should specify user-data that indicates this instance is the “root domain” instance. Upon booting, the instance will notice this flag in the user data, associate the Elastic IP address with itself, an add itself to the ELB.
    Note: At this point, we have a reliably-hosted single instance hosting the root domain and the subdomain.
  4. Create a second AutoScaling group (the “ELB AutoScaling group”) that uses the same AMI, with min=0 instances – the max can be anything you want it to – and set it up to use the ELB’s Health Check. The LaunchConfiguration for this group should not contain the abovementioned special flag – these are not root domain instances.
  5. Create an Alarm that looks at the CPUUtilization across all instances of the AMI, and connect it to the “scale up” and “scale down” Policies for the ELB AutoScaling group.

That is the basic idea. The result will be:

  • The root domain is hosted on an instance that redirects to the ELB subdomain. This instance is managed by a standalone Auto Scaling group that will replace the instance if it becomes degraded. This instance is also a member of the ELB, so it serves the subdomain traffic as well.
  • A second AutoScaling group manages the “overflow” traffic, measured by the CPUUtilization of all the running instances of the AMI.

TODO

Here are the missing pieces:

  1. A script that can be run as a boot-time hook that checks the user-data for a special flag. When this flag is detected, the script associates the root domain’s Elastic IP address (which should be specified in the user-data) and adds the instance to the ELB (whose name is also specified in the user-data). This will likely require AWS Credentials to be placed on the instance – perhaps in the user-data itself (be sure you understand the security implications of this) as well as a library such as boto or the AWS SDK to perform the AWS API calls.
  2. The explicit step-by-step instructions for carrying out steps 1 through 5 above using the relevant AWS command-line tools.

Do you have these missing pieces? If so, please comment.

Categories
Cloud Developer Tips

Using AWS Route 53 to Keep Track of EC2 Instances

This article is a guest post by Guy Rosen, CEO of Onavo and author of the Jack of All Clouds blog. Guy was one of the first people to produce hard numbers on cloud adoption for site hosting, and he continues to publish regular updates to this research in his State of the Cloud series. These days he runs his startup Onavo which uses the cloud to offer smartphone users a way to slash overpriced data roaming costs.

In this article, Guy provides another technique to track changes to your dynamic cloud services automatically, possible now that AWS has released Route 53, DNS services. Take it away, Guy.

While one of the greatest things about EC2 is the way you can spin up, stop and start instances to your heart’s desire, things get sticky when it comes to actually connecting to an instance. When an instance boots (or comes up after being in the Stopped state), Amazon assigns a pair of unique IPs (and DNS names) that you can use to connect: a private IP used when connecting from another machine in EC2, and a public IP is used to connect from the outside. The thing is, when you start and stop dozens of machines daily you lose track of these constantly changing IPs. How many of you have found, like me, that each time you want to connect to a machine (or hook up a pair of machines that need to communicate with each other, such as a web and database server) you find yourself going back to your EC2 console to copy and paste the IP?

This morning I got fed up with this, and since Amazon launched their new Route 53 service I figured the time was ripe to make things right. Here’s what I came up with: a (really) small script that takes your EC2 instance list and plugs it into DNS. You can then refer to your machines not by their IP but by their instance ID (which is preserved across stops and starts of EBS-backed instances) or by a user-readable tag you assign to a machine (such as “webserver”).

Here’s what you do:

  1. Sign up to Amazon Route 53.
  2. Download and install cli53 from https://github.com/barnybug/cli53 (follow the instructions to download the latest Boto and dnspython)
  3. Set up a domain/subdomain you want to use for the mapping (e.g., ec2farm.mycompany.com):
    1. Set it up on Route53 using cli53:
      ./cli53.py create ec2farm.mycompany.com
    2. Use your domain provider’s interface to set Amazon’s DNS servers (reported in the response to the create command)
    3. Run the following script (replace any details and paths, emphasized in bold, with your own):

      #!/bin/tcsh -f
      set root=`dirname $0`
      setenv EC2_HOME /usr/local/ec2-api-tools
      setenv EC2_CERT $root/ec2_x509_cert.pem
      setenv EC2_PRIVATE_KEY $root/ec2_x509_private.pem
      setenv AWS_ACCESS_KEY_ID myawsaccesskeyid
      setenv AWS_SECRET_ACCESS_KEY mysecretaccesskey

      $EC2_HOME/bin/ec2-describe-instances | \
      perl -ne '/^INSTANCE\s+(i-\S+).*?(\S+\.amazonaws\.com)/ \
      and do { $dns = $2; print "$1 $dns\n" }; /^TAG.+\sShortName\s+(\S+)/ \
      and print "$1 $dns\n"' | \
      perl -ane 'print "$F[0] CNAME $F[1] --replace\n"' | \
      xargs -n 4 $root/cli53/cli53.py \
      rrcreate -x 60 ec2farm.mycompany.com

Voila! You now have DNS names such as i-abcd1234.ec2farm.mycompany.com that point to your instances. To make things more helpful, if you add a tag called ShortName to your instances it will be picked up, letting you create names such as dbserver2.ec2farm.mycompany.com. The script creates CNAME records, which means that you will automatically get internal EC2 IPs when querying inside EC2 and public IPs from the outside.

Put this script somewhere, run it in a cron – and you’ll have an auto-updating DNS zone for your EC2 servers.

Short disclaimer: the script above is a horrendous one-liner that roughly works and uses many assumptions, it works for me but no guarantees.

Categories
Cloud Developer Tips

Alternatives to Elastic IPs for EC2 Name Resolution

How can you handle DNS lookups in EC2 without going crazy each time a resource’s IP address changes? One solution is to use an Elastic IP, a stable IP address that can be remapped to different instances, but Elastic IPs are not appropriate for all situations. This article explores the various methods of managing name resolution with EC2 instances.

Features of Different Name Resolution Methods

Before diving into the methods themselves let’s take a look at the factors to consider when evaluating methods of managing name resolution. Here are the factors:

  • Updatable in code. You will want to write code to make changes to the name resolution settings automatically, in response to infrastructure events (e.g. launching a new server).
  • Propagation delay. It can take some time for changes to name resolution settings to propagate (especially with DNS). A solution should offer some degree of assurance that changes will propagate within a known and reasonable period of time. [Note that some clients (e.g. the IE browser or the Java rutime) by default ignore the DNS TTL, artificially increasing the propagation delay for DNS-based methods.]
  • Compatible with DNS. If your service will be accessed by a web browser or other client that you do not control, your name resolution method will need to be compatible with DNS. Otherwise clients will not be able to resolve your hostnames properly.
  • Ease of implementation. Some solutions, while technically sufficient, are difficult to implement.
  • Public / Private IP addresses. Whether the solution can serve public and/or private IP addresses. If your clients are inside the same EC2 region then you want their lookups to resolve to the private IP address. Clients outside the same EC2 region should be served the public IP address.
  • Supply. Is there any practical limitation on the number of name resolution entries?
  • Cost. How much it costs to implement, including costs for idle resources and updating settings.

Methods of Name Resolution

As mentioned above, there are a number of different methods to manage name resolution. These are:

  • Traditional DNS.
  • Dynamically update the /etc/hosts file on the various application hosts. The /etc/hosts file on linux (like the C:\Windows\System32\Drivers\etc\hosts file on Windows) contains host-name-to-IP-address mappings that are checked before DNS is consulted, allowing it to override DNS. The file can be updated via pull (initiated by the host) or push (initiated by an external agent).
  • Store the mappings in S3 or SimpleDB. Clients must use the S3 or SimpleDB APIs for name resolution.
  • Use a dynamic DNS provider.
  • Run your own traditional DNS servers for your domain. Clients must be able to see these DNS servers.
  • Run your own dynamic DNS servers for your domain. Clients must be able to see these DNS servers.
  • Elastic IPs. The AWS pricing model discourages (though not strongly enough, I believe) Elastic IPs from being left unused, so you should use them for instances hosting services that are always on, such as your web server or your Facebook application. You should set up a DNS entry pointing the host names to the Elastic IPs, and then any remapping of the Elastic IP to a different instance happens via the EC2 API without requiring any change to DNS.

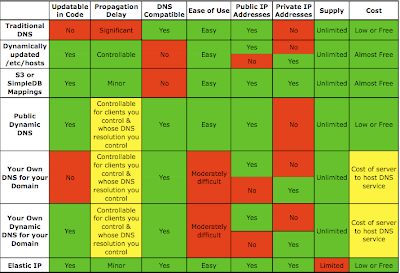
Here is a table (click on it to see it full size) showing how each of these name resolution methods stack up against each other:
Notes:

  • Dynamically updating /etc/hosts can be used to store either the public IP or the private IP but not both for the same client. You can use one /etc/hosts file for your clients inside the same EC2 region which contains the private IPs, and a different but corresponding /etc/hosts file for your clients outside the EC2 region (or outside EC2 completely) which contains the public IPs. The propagation delay is governed by the frequency with which you update the /etc/hosts file on each client. You can minimize this delay by increasing the frequency of updates. This technique is described in detail in an article by Tim Dysinger.
  • Similarly, the two “run your own DNS” methods (Your Own DNS for your Domain, Your Own Dynamic DNS for your Domain) can be used to resolve to either the public IP address or the private IP address, but not both for the same client. You should set up your clients inside EC2 to utilize the DNS service inside EC2, and the domain should be configured to point to the DNS service running outside EC2 so that clients outside EC2 will see the public IPs. Note that clients running inside EC2 whose DNS resolution you do not control (for example, another EC2 user’s client) will be referred to the public IPs. Jeff Roberts offers some great practical suggestions for running your own DNS inside EC2.

This table demonstrates the following:

  • Elastic IPs are the best choice when you need only a limited number of resolvable names and you will use them constantly. If you use their corresponding DNS name then they intelligently resolve to the public IP when looked up from the internet and to the private IP when looked up from within EC2.
  • If you need an unlimited number of resolvable names within EC2 then you should run your own dynamic DNS within EC2.
  • Methods that are incompatible with DNS should only be used with clients you control.

As we can see, Dynamic DNS (especially running your own) has one distinct advantage over using Elastic IPs: unlimited supply at no cost when unused.

When Running Your Own Dynamic DNS is Better than Elastic IPs

One application for running your own Dynamic DNS is a testing environment that includes large clusters of EC2 instances, for example database cluster or application nodes, connected to web layer instance(s). These cluster instances will only be visible to the front-end web tier, so they do not need a publicly resolvable IP address. And your testing environment is not likely to be running all the time. Elastic IPs would work here (presuming you needed only 5 or you could convince AWS to increase your Elastic IP limit to meet your needs), but would cost money when unused. A more economical solution might be to use your own Dynamic DNS within EC2 for these instances. If you have spare capacity on an existing instance then you can put the Dynamic DNS service there – otherwise you will need another instance, making the cost less attractive. In any case you’ll need the instance hosting the Dynamic DNS to have an Elastic IP to allow failover without affecting the clients. And you’ll need a script to dynamically configure the /etc/resolv.conf on your EC2 clients to point to the private IP address of the Dynamic DNS instance by looking up its Elastic IP’s DNS name.

Let’s compare the monthly costs of using Elastic IPs with the costs of running your own dynamic DNS for a testing environment such as the above. The cost reflects the following ingredients and assumptions:

  • The number of hours over the month that allocated addresses (DNS entries) are not associated with a live instance, in total for all allocated addresses. If you have DNS entries / addresses and leave them unmapped for 10 hours each then you have 100 unmapped hours.
  • The number of changes to the DNS mappings made that month.
  • The fractional cost of running an instance just to serve the dynamic DNS. If you have spare capacity on an existing instance then this is the instance cost multiplied by the fraction of the capacity that the dynamic DNS service uses. If you need to spin up a dedicated instance for the dynamic DNS service then this is the entire cost of that instance.
  • Pricing for Elastic IPs: free when in use. 1 cent per hour unused. First 100 remaps per month free, 10 cents per remap afterward.

It should be obvious that using dynamic DNS for this testing environment will be economical when

FractionalDNSInstanceCost < NumUnmappedHours * 0.01 + MAX(NumMappingChanges – 100, 0) * 0.1

For simplicity’s sake this can be rewritten in clearer terms:

FractionalDNSInstanceCost < NumInstances * ( NumHoursClusterUnused * 0.01 + MAX(NumTimesClusterIsLaunched – 100, 0) * 0.1)

Right about now I’m wishing Excel had better 3-D graphing capabilities. Here’s something helpful to visualize this:
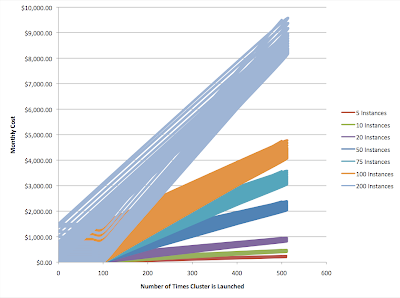
The chart shows the monthly cost of running clusters of different sizes according to how many times the cluster is launched. The color “bands” show the areas in which the monthly cost lies, depending on how many hours the cluster remains unused. For a given number of times launched (i.e. for a given vertical line), the “bottom” point of each band is the cost when the cluster is unused zero hours (i.e. always on), and the “top” point is the cost when the cluster is unused for 500 hours (about 20 days).

The dominant factors are, first, the number of instances in the cluster and, second, the number of times the cluster will be launched. A cluster of 100 instances costs $10 each time it is launched beyond the first 100, (plus $1 for each hour unused). For large cluster sizes, the more times you launch, the higher the cost of using Elastic IPs will be and the more attractive the run-your-own dynamic DNS option becomes.